
As soon as you buy an SSL certificate, it doesn’t get automatically get installed and enable HTTPS on your website. There are several steps you need to take from your end to complete this process.
There are 3 steps you need to follow after purchasing an SSL.:
- Certificate Signing Request (CSR) generation
- Validation process
- Installation Process
In this article we’ll cover the CSR generation process for cPanel in 3 easy steps. If you’re using different server, refer our articles for CSR generation on various types of servers.
CSR Generation In cPanel
Step 1
Log into cPanel
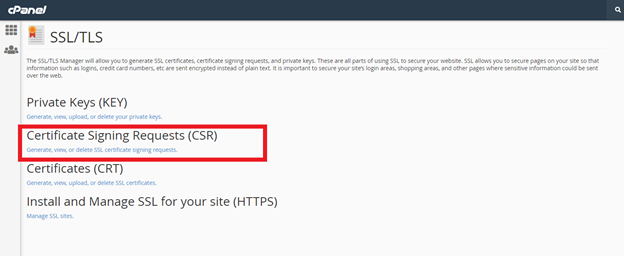
Click on SSL/TLS in the Security section.

Step-2
Go to ‘Generate, view, or delete SSL certificate signing requests’ under the Certificate Signing Requests (CSR).
Steps-3
Fill the following fields with only alphanumeric characters.
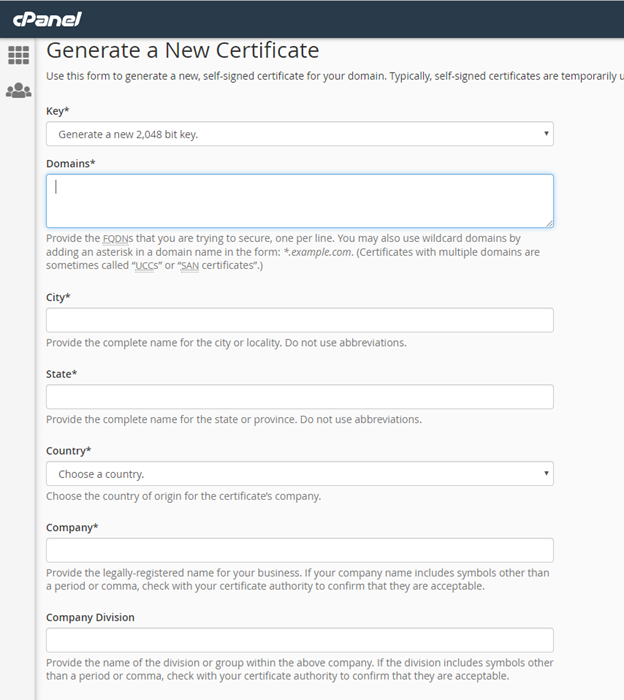
Domains: Enter the fully qualified domain name. The primary domain name for which you have applied the SSL certificate.
For wildcard SSL, add an asterisk in front of the domain (*.mydomain.com). Caution: Don’t write * before the www version of the domain like *.www.mydomain.com. unless you want to secure second level of subdomains such as blog.www.mydomain.com, mail.www.mydomain.com etc.

City: Provide the full name of your city. Do not use abbreviations.
State: Provide the full name of your State. Do not use abbreviations.
Country: Select country from the drop-down menu.
Company: Officially registered name for your business. It is mandatory for Organization and Extended Validation certificates. For Domain Validation SSLs, you can use “NA” if your organization is not legally registered.
Company Division: Department name inside the organization. Write “NA” if a certificate a Domain Validation certificate or there are no departments in the company.
E-mail: Enter your e-mail address. This field is optional.
Passphrase: Keep this field black.
Description: Add some keywords in order to locate a particular CSR in the list if you have more than one CSR. This too is optional.
Click on ‘Generate’.
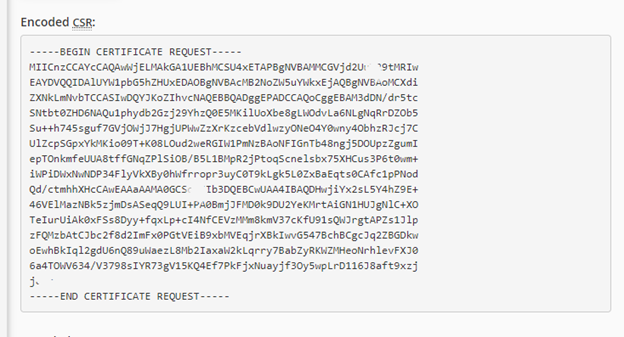
At this point, your private and public keys have been successfully generated. The generated CSR code includes the public key.
You need to send this CSR code to the certificate authority along with other required details.
Include the header and footer when sending your CSR to the certificate authority:
—–BEGIN CERTIFICATE REQUEST—–
—–END CERTIFICATE REQUEST—–
The private key is stored locally on the server and will be needed at the time of installation process once the CA issues you the certificate.
After this step, the CA will follow some validation steps based on the type of certificate you have chosen. For DV SSL, you will get a validation email on your business email ([email protected], [email protected]) just in minutes after you send the CSR code and other details to the CA. For OV and EV, the validation process may take somewhere between 1 day to 5 days.
Learn more about the next steps after you generate your CSR on cPanel:
Step 2: Validation process
Step 3: Installation Process