


How to Secure Zoom: 7 Important Zoom Security Settings

 (65 votes, average: 4.49 out of 5)
Zoom security issues made headlines amidst the COVID-19 pandemic and generated feelings of distrust among users. But the good news is that there are some new Zoom security settings to make your meetings more secure
On April 28, 2020, Zoom announced that the total number of daily users had reached 300 million, which is up from the 10 million the company reported in 2019. That’s nearly a 3,000% (2,900%) hike over a short time interval. Dealing with such overwhelming growth is a challenge for any company. Zoom started to face many operational challenges, and one of them was zoom cybersecurity. But Zoom is continuously striving to improve itself and strengthen its security posture and increase its Zoom security settings options.
Here, we’ll introduce you to some of the latest Zoom security settings and show you how to secure Zoom meetings.
How to Secure Zoom Meetings in Your Zoom Security Settings
If you are wondering whether the Zoom app is safe, we want to go ahead and say, “yes! Zoom meetings are safe if you are aware of these Zoom security settings and how to leverage them.” So, here’s what you need to know about how to secure zoom meetings.
Don't make the same mistakes
Yahoo, Equifax, Home Depot,
LinkedIn, and Ericsson did!
Get our free 15-point checklist and
avoid the same costly pitfalls.
Contact details collected on InfoSec Insights may be used to send you requested information, blog update notices, and for marketing purposes. Learn more...
1. Enable the Waiting Room Feature
This Zoom security feature gives hosts the power to allow only trusted participants into their meetings. When you enable the waiting room feature, participants have to wait until the admin allows them to enter the meeting.
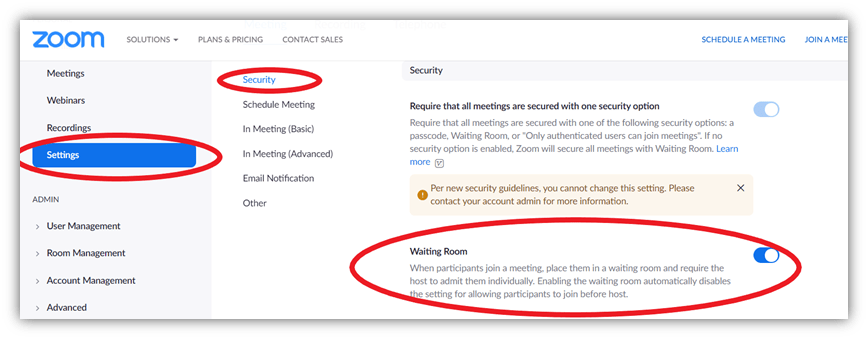
To set the waiting room feature by default for all your future meetings, open Zoom.us in your browser and log in.
- Click on MY ACCOUNT from the top menu on the right-side.
- Press Settings in the left sidebar navigation.
- Select Security.
- Enable Waiting Room.
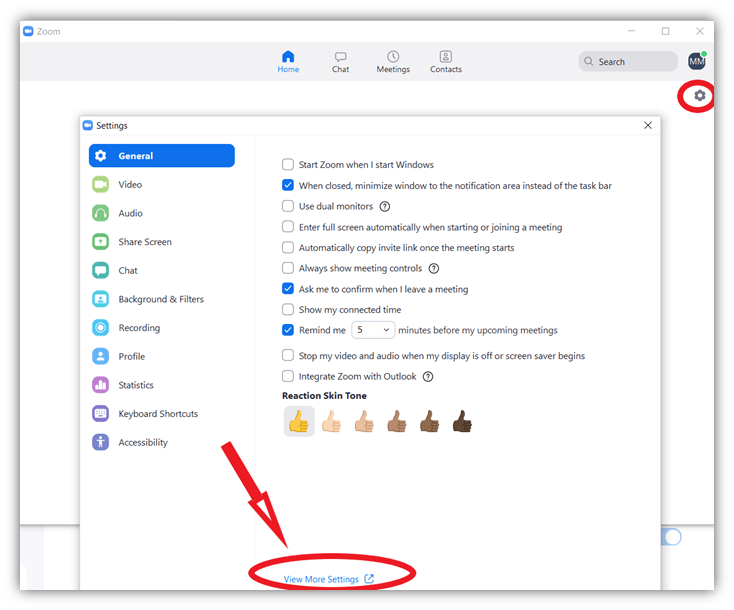
Important Note: If you’re using Zoom Desktop App, click on the menu icon from the top-right corner and click on View More Settings at the bottom of the settings window (shown in the screenshot below). You’ll be redirected to Zoom’s website where you will see the options mentioned above. (Do this for all the next steps mentioned in this article if you are using Zoom desktop app).
If you want to enable the Zoom waiting room for only one meeting, go to Schedule from the Zoom interface (app, browser, desktop client) and scroll down to the Security section where you will find Enable Waiting Room option.
Now, whenever a new participant wants to join the meeting, you (the admin) will get the request. Only after you accept can the new person join the meeting.
2. Require a Passcode or Link to Join
This is one of the most basic yet effective ways to control who can join your Zoom meetings. However, there are two ways you can go about inviting people to your Zoom meeting:
1. Give Invitees a Personal Meeting ID (PMI)
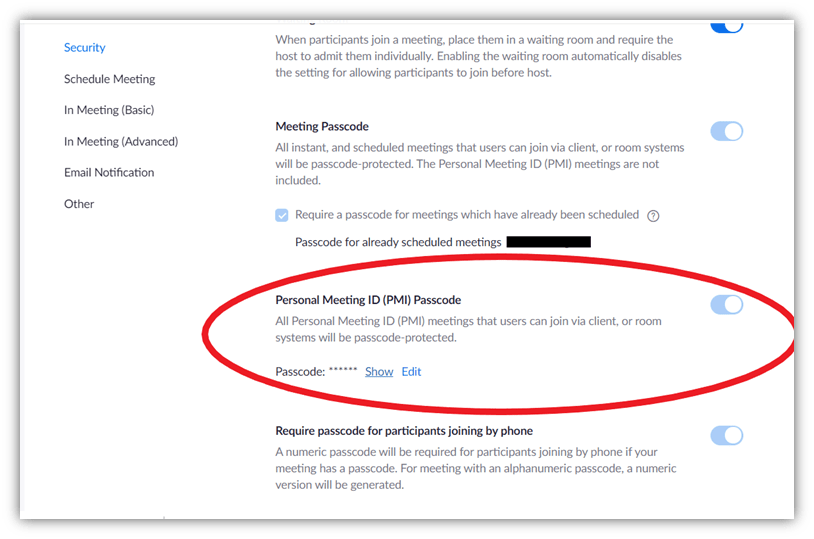
A personal meeting ID is a 10-digit number that you can share with your participants. For PMI, a passcode is mandatory now. By default, Zoom creates a six-digit alphanumeric passcode for every Zoom meeting. However, you can make it stronger or change the passcode in the Zoom security settings by following the directions below:
- Open Zoom.us in your browser and log in.
- Click on MY ACCOUNT from the top menu on the right-side.
- Click on Settings from the left sidebar.
- Select Security.
- Locate the Personal Meeting ID (PMI) Passcode.
- Click on Edit to make stronger passcode byadding more letters, numbers, and special characters.
2. Send Meeting Links (URLs) as Invitations
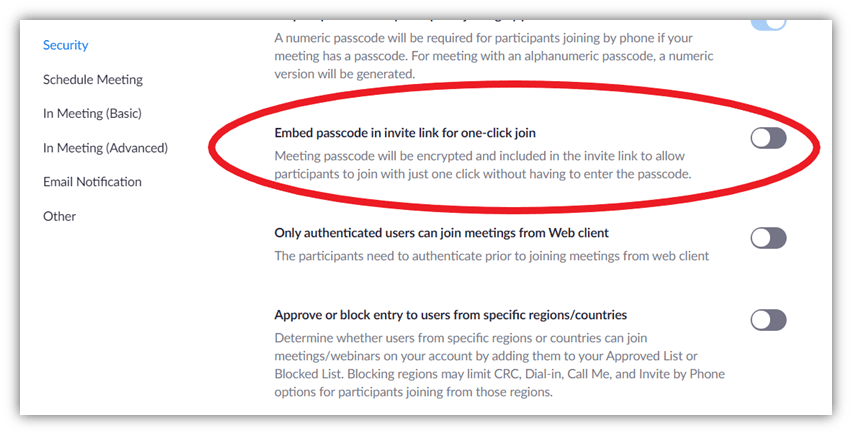
Sending meeting links alone is an insecure way to host a meeting. That’s because the default meeting URL has embedded passcodes. This means anyone with this URL can directly join the meeting without knowing the passcode. However, you now can disable this setting and make it mandatory for all the participants to input the passcode.
To disable the embedding of the passcode into the URL:
- Open Zoom.us in your browser and log in.
- Then, click on MY ACCOUNT from the top menu on the right-side.
- Click on Settings from the left sidebar.
- Select Security.
- Locate Embed passcode in the invite link for one-click join.
- By default, it would be turned on. Disable it by clicking on the right-side tab.
- Now, all your participants need to input a passcode even if they have access to the meeting link.
Send this passcode to participants on their email instead of publishing it on insecure places like social media to ensure it doesn’t get compromised.
3. Enable the ‘Lock Meeting’ Setting
Some people avoid the “Enable waiting room” feature when there are many participants in a chat as it distracts the admin every time someone new wants to join. Another Zoom security setting you can enable to avoid this issue is Lock Meeting. Once the clock reaches a specific time or once all the expected participants are present, you can lock the meeting to prevent anyone else from joining.
Once you start a meeting and notice that everyone has arrived, go to the Security tab at the bottom of the screen. There, you’ll find the Lock Meeting option.
It’s like some college professors tend to lock their classroom doors at the start of class to prevent tardy students from showing up late and interrupting the class. While this is bad news for latecomers, it’s a great relief for meeting hosts who don’t want to worry about unexpected “guests” crashing the meeting or sending a joining request in the middle of the meeting.
4. Suspend Participant Activities
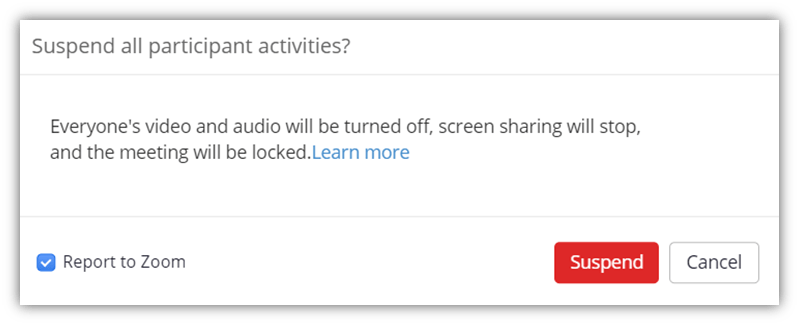
If someone starts misbehaving in the middle of the meeting, you can suspend all their activities immediately. This option will:
- Turn off all the participants’ audio and video,
- Cease screen sharing, and
- Lock the meeting.
The best thing about this option is that you don’t need to end the meeting and reschedule everything. This feature will simply pause the meeting to give you sufficient time to kick out the unwanted participant and resume the meeting.
To pause a meeting, go to the Security tab and click on Suspend Participant Activities.
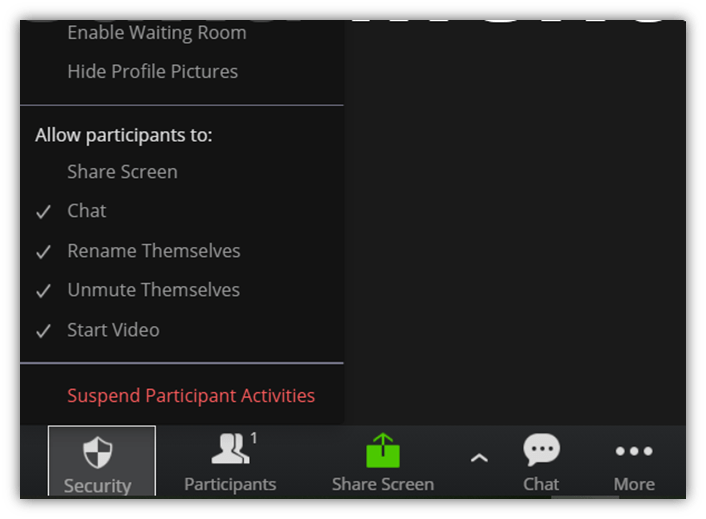
After that, you can click on the Participants option, select the unwanted participants, click on the More fly-out menu, and select Remove.
To restart the meeting as the meeting host, unmute your audio and/or start your video. Ask participants to enable their audio and video, too, if necessary.
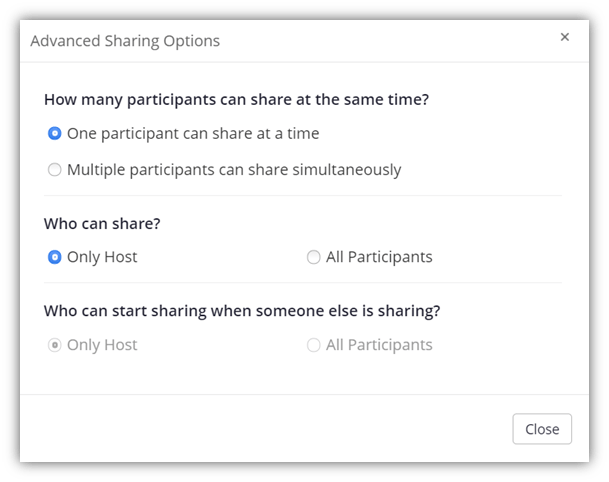
5. Limit Screen Sharing
Screen sharing is one of the most convenient features that Zoom offers. But what if someone starts sharing the screen and displaying inappropriate content? Luckily, there’s now a setting to avoid those issues.
In business meetings where the number of participants is limited and you know all of the people involved, the chance for such mischief is negligible. But when you have many unknown participants in the meeting, such as in online academic classes, open government meetings, or live entertainment events, you should consider limiting the screen sharing option.
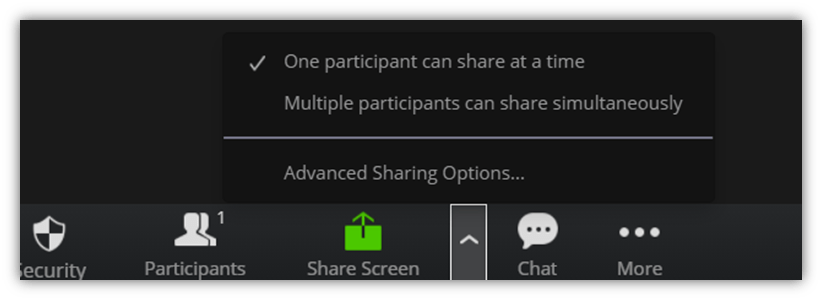
Once the meeting starts, click on the Share Screen option from the menu at the bottom. Select the Advanced Sharing option. Here, you can choose:
- Whether only the host can share their screen, or
- To allow participants to share the screen simultaneously while the host or other participants are sharing their screens.
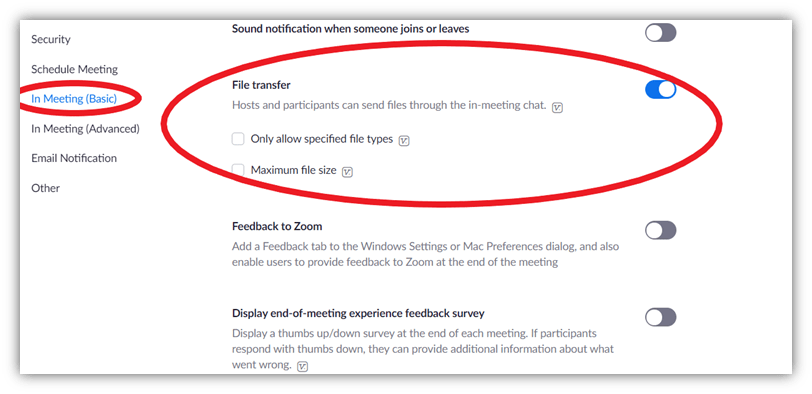
6. Limit File Sharing Capabilities
Another cool feature about Zoom is that it allows users to share files via chatroom. But when you are dealing with a large number of unknown participants, one of them might post malware or inappropriate content in the chatroom. But the good news is that you can easily restrict file sharing by taking the following steps:
- Open Zoom.us in your browser and log in.
- Click on MY ACCOUNT from the top menu on the right-side.
- Choose Settings from the left-hand sidebar.
- Select In Meeting (Basic).
- Locate File Transfer.
If you don’t want anyone else to share the files during the meeting, you can turn this feature off. If you decide to enable it, you’ll get options to limit the file types and sizes that users can share.
7. Enable Two-factor Authentication
Two-factor authentication adds another layer of Zoom security for organizations who want to make their employees’ accounts more secure. (And what company doesn’t want that?) The way 2FA works is that users will receive a secret one-time password either on their phone or an app once you enable this setting. This requires them to verify that they are who they claim to be because they have access to the registered device or app.
To enable 2FA in your Zoom security settings, sign in to the Zoom dashboard:
- Go to the Navigation menu and click Advanced and then tap Security.
- Turn on the “sign in with Two-Factor Authentication” option.
- You’ll see the option of whether you want to set 2FA via SMS or a third-party authentication app.
- If you choose to pair your phone, you’ll receive a one-time password (OTP) every time you want to log in to Zoom.
- For apps, you need to download apps such as Google Authenticator, Microsoft Authenticator, or FreeOTP. You’ll receive a unique sign-in code on such apps when you log in to Zoom.
If you have a business account, you’ll be able to enforce 2FA for all users’ accounts or users that belong to a particular group or have predefined roles. Check out these detailed instructions on how to enable 2FA on Zoom.
Bonus Tip
Suppose you’re a business or organization whose employees tend to share highly sensitive information via Zoom meetings. In that case, you can enable end-to-end (E2E) encryption to add another layer of protection. To enable E2E encryption in your Zoom security settings:
- Open Zoom.us in your browser and log in.
- Click on MY ACCOUNT from the top menu on the right-side.
- Select Settings from the left sidebar.
- Locate Allow use of end-to-end encryption and enable it.
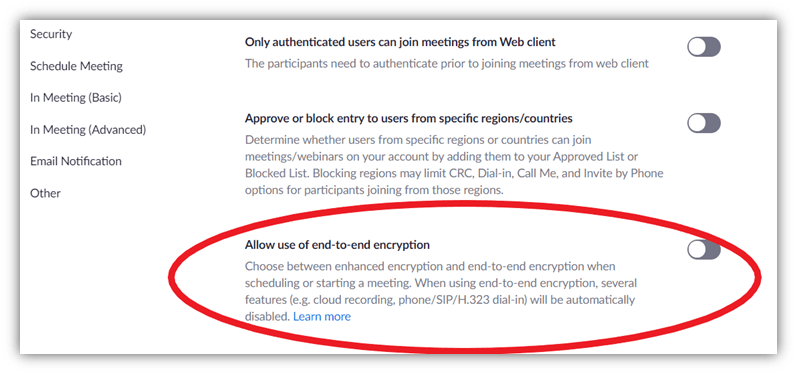
Please note that you won’t be able to access several key features in the Zoom meetings as they don’t work with E2E encryption.
Why: Zoom meetings are encrypted with 256-bit Advanced Encryption Standard (AES). But the encryption occurs between Zoom client and Zoom’s servers and not directly between two Zoom users’ endpoints. In other words, any data transmitted between meeting participants reaches Zoom’s servers first before being redirected to the intended participant.
Since Zoom’s servers stored decryption keys, this means that if someone at Zoom wanted to access your information, they could have potentially decrypted and accessed what you thought was your end-to-end secured data. And considering that one of Zoom’s past employees was a Chinese spy, it’s understandable why people still have trust issues with Zoom. Thankfully, though, the FTC required Zoom to change its security practices as part of its settlement.
With E2E encryption, your data will get end-to-end encryption, having direct communication between you and your clients, without Zoom’s server being a mediator. That’s why it is one of the most important Zoom security settings to protect your meeting data.
4 Experts’ Opinions on How to Secure Zoom Meetings
We asked several industry leaders which Zoom security features they use and recommend to our readers. Here are their Zoom security tips and suggestions.
Andreas Grant, who is a network engineer at networkshardware.com and works with ISP security issues, shared one more Zoom security tip with us:
“Use Zoom from a browser. The reason you should use it from a browser is that Zoom’s encryption is questionable. And a site loaded on a browser has much stricter permissions than a Software program. Using it from a browser thus adds a security layer, which makes it much harder for any security breach in Zoom to make any damage.”
Kevin Parker, a cybersecurity expert and the cofounder of vpnAlert, recommends using password managers and proxy servers:
“Use a proxy server. Proxy servers add that extra layer of security to your device. You can access hardware and software versions, but I’d recommend a hardware version in this case. Proxy servers hide your traffic footprint. Also, you can get a website to generate secure passwords for you. Once you’ve done that, I’d recommend using a password manager that is separate from your browser to store them.”
We asked Kristen Bolig, founder of security advice company SecurityNerd, which Zoom security settings she recommends. She offers the following insights:
“Zoom’s long list of security vulnerabilities has proven to be a PR nightmare for the video conferencing giant. In response, Zoom rolled out many new features to tighten its security. All users now benefit from full encryption and tools that help fight back against threats like Zoom bombers. You can now click ‘Suspend Participant Activities’ to block unknown participants who joined your meeting. You should always require passwords to join Zoom meetings. It’s also a good idea to update your Zoom app to take advantage of Zoom’s new security measures. I also recommend you set up two-factor authentication to protect your account from scammers.”
Which features are important to address the Zoom safety issues? Here’s what Jeremy Harrison, founder of Hustle Life, has to say:
“There were instances of Zoombombings before, and it quickly got out of hand. But these have already been corrected, and it’s reasonably safe to say that Zoom is secured. Here are a couple of things you can do: Generate a new ID for every meeting you launch using the options panel. This way, future sessions won’t be compromised. Change settings so that each participant will need a password to access the meeting. Enable Zoom’s ‘Waiting Room’ feature, which lets meeting hosts keep would-be participants in a digital queue until they approve them to join the session.”
Wrapping Up on Zoom Security Settings
Zoom has a lot of great advantages:
- It’s easy to set up and use,
- You can include up to 100 participants with free account, and
- It includes some cool capabilities like screen sharing and chatbot.
These are a few of the reasons why Zoom became so famous during the global pandemic. People needed an easy-to-use platform for online classes, remote work, and socializing.
It’s obvious that any company would find it overwhelming to deal with such a steep demand. But Zoom has done an impressive job identifying the security loopholes and introducing new Zoom security settings to prevent cyber attacks.
But why did Zoom security became such a big issue? And how did the company respond to those issues? We’ll explore the answers to these questions in our next article: Is Zoom Secure? Breaking Down 10 Zoom Security Issues.
Manage Certificates Like a Pro
15 Certificate Lifecycle Management Best Practices to keep your organization running, secure and fully-compliant.
Contact details collected on InfoSec Insights may be used to send you requested information, blog update notices, and for marketing purposes. Learn more...


2018 Top 100 Ecommerce Retailers Benchmark Study
in Web Security5 Ridiculous (But Real) Reasons IoT Security is Critical
in IoTComodo CA is now Sectigo: FAQs
in SectigoStore8 Crucial Tips To Secure Your WordPress Website
in WordPress SecurityWhat is Always on SSL (AOSSL) and Why Do All Websites Need It?
in Encryption Web SecurityHow to Install SSL Certificates on WordPress: The Ultimate Migration Guide
in Encryption Web Security WordPress SecurityThe 7 Biggest Data Breaches of All Time
in Web SecurityHashing vs Encryption — The Big Players of the Cyber Security World
in EncryptionHow to Tell If a Website is Legit in 10 Easy Steps
in Web SecurityWhat Is OWASP? What Are the OWASP Top 10 Vulnerabilities?
in Web Security