


How to Install SSL Certificates on WordPress: The Ultimate Migration Guide

 (57 votes, average: 4.79 out of 5)
How to install an SSL certificate on a WordPress website + HTTP to HTTPS migration guide
There are 5 steps involved to install an SSL certificate on your WordPress website-if you have bought it from a third-party supplier like us ( i.e. it isn’t bundled with your hosting account).
- Step 1: Generate the CSR
- Step 2: Install the SSL in the hosting server
- Step 3: Enable SSL in WordPress with the help of a plugin or manually
- Step 4: Fix Mix Content Warning in WordPress (if any)
- Step 5: Update Google Analytics & Submit A New Sitemap to Google
Step 1: Generate the CSR
Different types of servers have different CSR generation process. We’ve covered the CSR generation process for the most popular platform, cPanel.
- Login to your cPanel account and search for the Security section. Click on SSL/TLS Manager over there.
- Go to ‘Generate, view, or delete SSL certificate signing requests’ under the Certificate Signing Requests (CSR).
- Fill in the fields Domains, City, State, Country, Company, Company Division, E-mail, Passphrase, and Description with only alphanumeric characters.
- Click on Generate
To understand this process in more detail, please review this article: How to generate a CSR in cPanel. Other resources: Generate CSR on other servers.
Don't make the same mistakes
Yahoo, Equifax, Home Depot,
LinkedIn, and Ericsson did!
Get our free 15-point checklist and
avoid the same costly pitfalls.
Contact details collected on InfoSec Insights may be used to send you requested information, blog update notices, and for marketing purposes. Learn more...
At this point, your private keys and public keys are successfully generated. The CSR code includes the public key and it will be sent to the certificate authority (CA i.e. certificate provider company) along with other required details, as per the CA’s instructions.
After you send the required details along with your public key to the CA, the CA will vet your credentials against the type of validation you seek. The CA will ask you to perform some steps to prove your domain ownership (and additional steps for OV and EV SSL certificates). Learn more about the Validation Process here.
The CA will issue you the SSL certificate once the validation process is completed. They’ll email you files that you need to complete the certificate installation.
Step 2: Install the SSL on the hosting server
Different web hosts and servers have different installation process. We’ve covered the installation process for cPanel, one of the most used servers. All the other types of servers have more or less similar installation process. If you are using a different server, click here for more information.
To start out:
Go to cPanel
Part 1
Go to SSL/TSL under SECURITY
Click on Generate, view, upload, or delete SSL certificates. Under Certificates (CRT)
- Locate Paste the certificate into the following text box under ‘Upload a New Certificate.’ Copy-paste the code from the *yourdomain*.crt file which you have received from the Certificate Authority in the email. You can also download it from your account directly. Do include the header and footer (—–BEGIN CERTIFICATE—– and —–END CERTIFICATE—–) in the code.
- Click on Save Certificate or Upload.
OR
- Under ‘Choose a certificate file (*.crt)’, click on ‘Choose File’ and upload .crt file that CA sent you in email. Click on ‘Upload Certificate’.
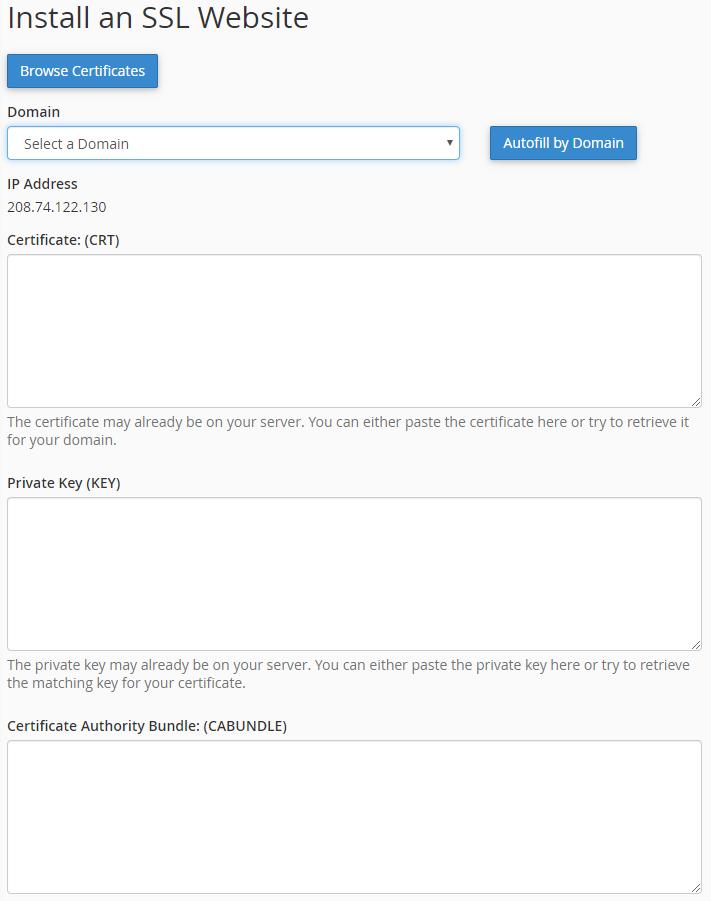
Part 2
Now go back to the previous menu
- Click on Manage SSL sites under ‘Install and Manage SSL for your site (HTTPS).’
- Select the domain for which the SSL has been issued from the drop-down menu.
- At this time the system will automatically fetch and fill the Certificate: (CRT) and Private Key (KEY) fields.
- Copy- paste the CA Bundle (chain of intermediate certificates) provided by CA into the box under Certificate Authority Bundle (CABUNDLE)
- Click on the “Install Certificate”
- And it’s done! The SSL certificate is now installed on the server.
- Now, next step is to enable SSL in WordPress by switching your site URLs from HTTP to HTTPS.
Step 3: How To Enable SSL in WordPress with the help of a Plugin
One of the best plugins to install SSL in WordPress is Really Simple SSL Plugin.
- Go to WordPress dashboard
- Go to Plugins > Add New.
- Search and install the Really Simple SSL Plugin
- Go to Plugins, locate ‘Really Simple SSL Plugin,’ click on Settings below it.
- Click on “Go ahead activate SSL!”
- If there are no mixed content errors, your website will be shifted from HTTP to HTTPS.
- If there are mixed content errors, scroll down to step 4.
OR
Install SSL WordPress SSL Manually (Not recommended)
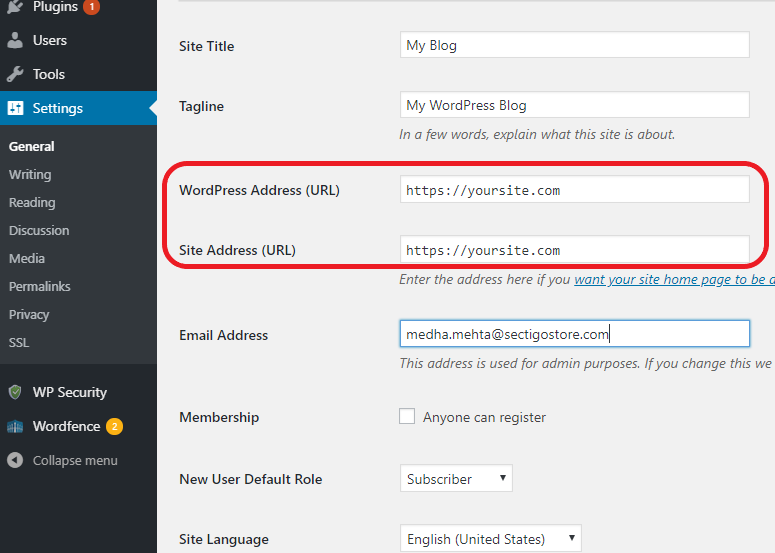
Part 1
- Got to Settings
- Click on General
- Enter your domain name with HTTPS:// in WordPress Address (URL) and Site Address (URL) address fields by replacing HTTP with HTTPS.
- Save changes
- Log out and re-login in WordPress
Part 2
Redirect in Apache
- Locate the .htaccess file in the root directory of the WordPress site. (You may need to enable the show hidden files option in your FTP client to view these hidden files.)
- Add this code in .htaccess file
<IfModule mod_rewrite.c>
RewriteEngine On
RewriteCond %{HTTPS} off
RewriteRule ^(.*)$ https://%{HTTP_HOST}%{REQUEST_URI} [L,R=301]
</IfModule>
3. Add the following code to wp-config.php file to add HTTPS to WP Admin
define('FORCE_SSL_ADMIN', true); Redirect in Nginx
If your WordPress site is running on Nginx, write following code in the Nginx config file.
server { listen 80; server_name yourdomain.com www.yourdomain.com; return 301 https://yourdomain.com$request_uri; } Don’t forget to replace yourdomain.com with your actual website name.
If there are mixed content errors, scroll down to step 4.
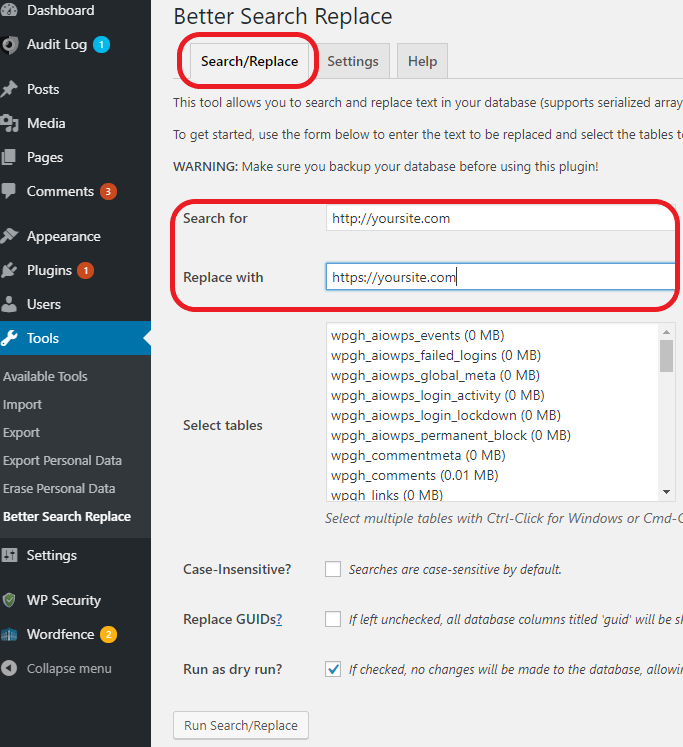
Step 4: Fix Mix Content Warning in WordPress (if any)
When you migrate to HTTPS from HTTP, if everything (all the pages, images, scripts, stylesheet) don’t load over HTTPS, the browser shows a Mixed Content Warning.
For example, when you are using absolute referencing for images, scripts, stylesheet, etc:
these pages are still pointing to your domain name with HTTP, however, your site is now on HTTPS. Your website address is HTTPS but it’s trying to load content via insecure HTTP urls. That’s why the system shows the error.
Now, either you can manually change the coding and update all the links to HTTPS, which is time consuming.
OR
Use plugins like Better Search Replace. Under Search/Replace tab, write your HTTP domain in Search for and HTTPS domain in Replace with.
Click on Run Search/Replace and it will replace all the absolute reference HTTP urls with HTTPS.
Step 5: Update Google Analytics & Submit A New Sitemap to Google
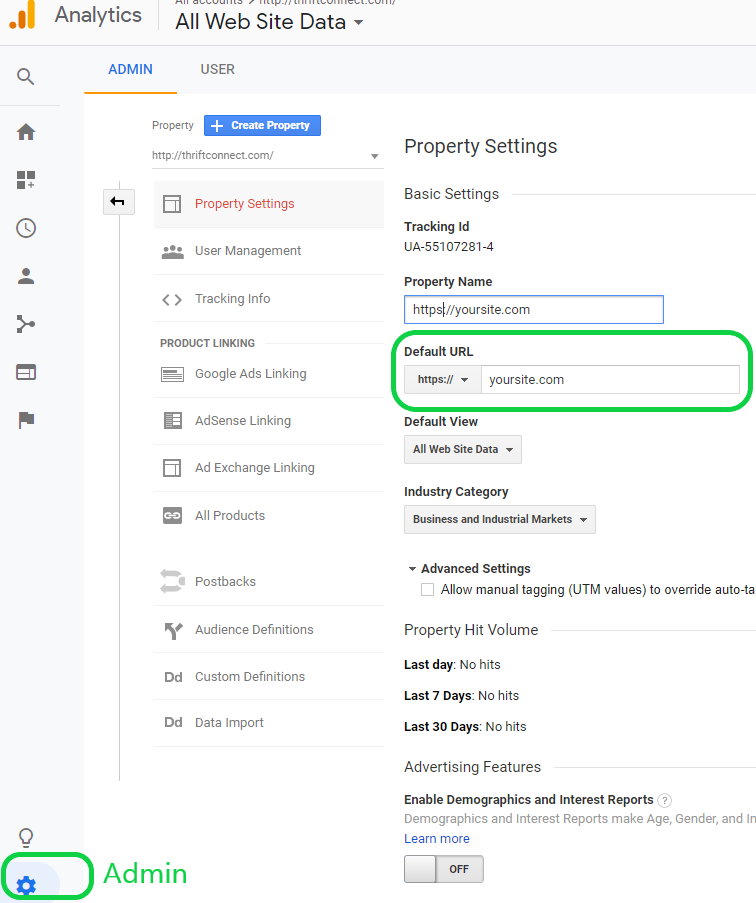
Let the search engine know that your website will be on HTTPS instead of HTTP. Part 1
Part 1
- Go to Google analytics
- Go to Admin
- Property
- Property Settings.
- In Default, URL field update your domain name with HTTPS
- Save
Part 2
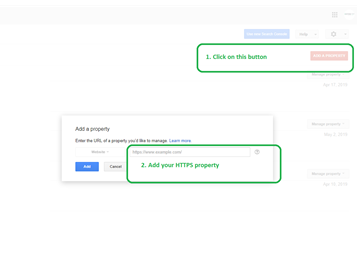
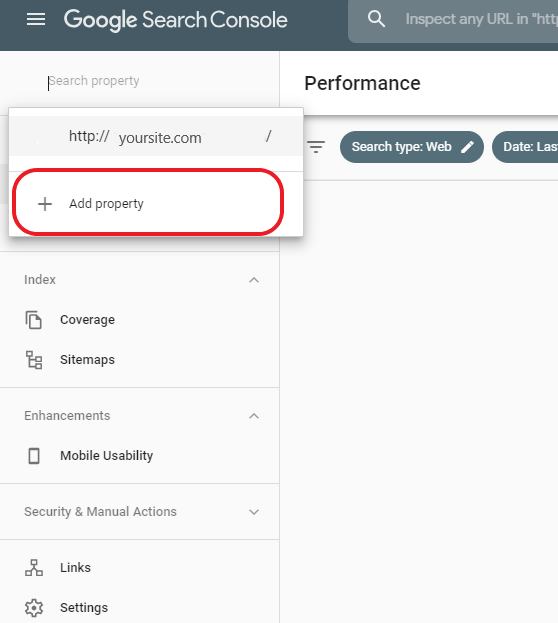
- Go to Google Search Console
- Click on ‘Add a property’ on top right side
- Add your website’s new HTTPS address in the popup
- Google will ask you to select a method to prove your authenticity
- Choose among the options.
- HTML file upload
- HTML tag
- Google Analytics
- Google tag manager
- Google will walk you through the step-by-step verification process.
- For older version
For newer version
Congratulation! You have successfully installed the SSL certificate on your WordPress and also did all the needed additional steps that are crucial for SEO ranking!
How to choose the right type of SSL certificate for a WordPress site?
Once you have decided from where to buy your cert, you need to determine what type of SSL is best for your WordPress site.
- For informative websites, blogs, personal websites, a Domain Validated SSL certificate is sufficient.
- If your WordPress site offers eCommerce, paid memberships, paid subscriptions or accepts donations or charity, OR if your users need to fill any forms or log in details such as email ids, passwords, etc., then Organization Validated (OV) or Extended Validated SSL is recommended.
- If your WordPress site has multiple domain names, for example, myblog.com, myblog.net, mysite1.ca, Multi–domain SSL is needed.
- For websites with subdomains, for example, “blog.mysite.com,” “mail.mysite.com” etc., a wildcard SSL certificate is required to secure all the subdomains.
- For websites with both subdomains and multi-domains, Multidomain Wildcard SSL is sought after.
Once you have finalized the SSL provider and figured out which type of SSL is right for your WordPress site (and fits in your budget), purchase it and move forward to the installation process. If you have bought SSL installation services from your SSL provider, you don’t need to worry about any further steps and can leave the article from here!
Get installation service from SectigoStore for as low as $49 one-time cost!
How to get an SSL certificate for WordPress?
Before you get an SSL certificate from your web hosting company, compare the prices with other SSL providers. Sometimes the price difference is mind-blowing. (Make sure your hosting provider allows an SSL certificate from a third party.)
For example, the retail price for a Positive SSL (DV) is $49/year. But you can get the same Positive SSL DV for less than $10/year, with $50,000 warranty, from SectigoStore!
Manage Certificates Like a Pro
15 Certificate Lifecycle Management Best Practices to keep your organization running, secure and fully-compliant.
Contact details collected on InfoSec Insights may be used to send you requested information, blog update notices, and for marketing purposes. Learn more...


2018 Top 100 Ecommerce Retailers Benchmark Study
in Web Security5 Ridiculous (But Real) Reasons IoT Security is Critical
in IoTComodo CA is now Sectigo: FAQs
in SectigoStore8 Crucial Tips To Secure Your WordPress Website
in WordPress SecurityWhat is Always on SSL (AOSSL) and Why Do All Websites Need It?
in Encryption Web SecurityHow to Install SSL Certificates on WordPress: The Ultimate Migration Guide
in Encryption Web Security WordPress SecurityThe 7 Biggest Data Breaches of All Time
in Web SecurityHashing vs Encryption — The Big Players of the Cyber Security World
in EncryptionHow to Tell If a Website is Legit in 10 Easy Steps
in Web SecurityWhat Is OWASP? What Are the OWASP Top 10 Vulnerabilities?
in Web Security