How to Set Up SSH Without a Password in Linux
SpyCloud recovered 721.5 million stolen credentials from the darknet in 2022. Don’t be the next victim. Go passwordless! Protect one of attackers’ favorite network entry points. Discover how to log in to SSH without a password in Linux.
In 2022, Linux malware hit record numbers with Atlas VPN researchers reporting a 50% year-over-year increase and a whopping 117% increase in Q4 alone. This shows that while Linux remains one of the “safer” options compared to other operating systems, it isn’t immune to security threats.
Do you still log in to your server via secure shell (SSH) using your username and password? It could put your server and organization at risk of credential theft; login info is among the most sought items in the criminal underground marketplaces.
Time to act! Learn in four easy steps how to:
- Set up SSH private and public key-based authentication.
- Access your server without a password in Linux.
Let’s get down to work!
How to Set Up Passwordless SSH in Linux in 4 Steps
I remember when I started working in web hosting. At the time, many customers were using the insecure file transfer protocol (FTP) to download and upload files to websites. Then SSH came to light and immediately gained popularity, becoming a virtually indispensable tool. Why? Because it was a network communication protocol that allowed the use of cryptography to:
- Execute commands,
- Transfer files,
- Configuring remote servers, and
- Remotely manage systems and applications.
The advantage? As the communication is encrypted, the data transmission is protected by eavesdroppers and from dangerous man-in-the-middle attacks.
SSH supports several authentication methods, but the two most widely used are password-based authentication and public-key-based authentication. With key-based authentication, you don’t have to use a password (hence why it’s also called passwordless SSH); it’s optional. And with stolen credentials being identified by Verizon as the primary cause of web application breaches, it may be wise to consider using the latter.
Want to give it a go? Setting up passwordless in Linux is easy and involves only four quick steps. For this demonstration, we’re going to use Ubuntu 20 LTS.
1. Check If You Already Have an SSH Key on Your Client
Are you 100% sure you don’t have an SSH key pair already saved on your device? To play it safe, verifying that you don’t before setting up SSH without a password in Linux is always better. You don’t want to end up overwriting your existing keys, right? To check for any existing keys:
- Open a terminal using the shortcut (i.e., hit the keys CTRL+ALT+T) or by clicking on the Show Applications button on the dash bar.
- Type terminal in the search box and select it.
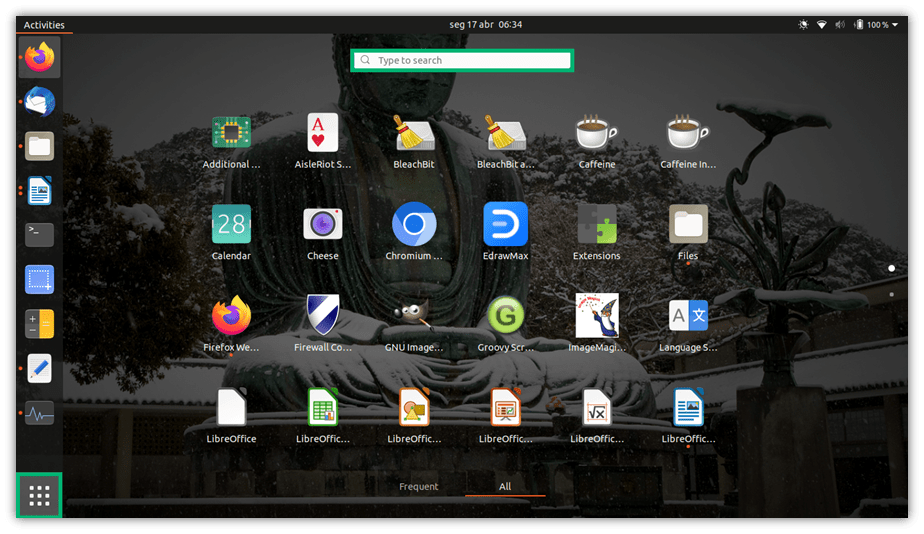
- Run the command ls -al ~/.ssh/id_*.pub. If you get an error message like “no such file or directory” or “no matches found” (as shown in the screenshot below), it means you don’t have any SSH keys and can proceed to step 2.

Did you find out you already had a key pair? Then you can either go directly to step 3 to continue the setup of passwordless SSH in Linux, or back up the old keys and generate new ones by following the instructions in step two.
2. Generate Your SSH Key Pair for Passwordless SSH in Linux
SSH keys are generated through a key generator tool. This tool uses a one-way (i.e., not reversible) mathematical formula (i.e., algorithm) to create the public and private key pair. The tool is included in the SSH command line tool suite.
To generate your key pair on your local machine:
- Type ssh-keygen in the terminal you’ve opened and hit Enter.
In this case, because we didn’t specify a particular key algorithm, it will generate Rivest–Shamir–Adleman (RSA) based keys automatically. SSH supports also other algorithms like the obsolete digital signature algorithm (DSA) and the new elliptic curve digital signature algorithm (ECDSA). However, to avoid compatibility issues, we’ll use RSA for now. Should you wish to utilize a different algorithm, all you have to do is to add -t followed by the chosen algorithm name to the same command. For example, ssh-keygen -t dsa.

- Once prompted, enter the path to the file where you want to store your RSA private key. To add an extra layer of security, you may want to ensure that your private key is stored in a secure location (e.g., in Sectigo Certificate Manager). This is a one-stop shop for all your keys and every kind of certificate that makes installation, discovery, and renewal a piece of cake. For simplicity, we’ve stuck to the default folder (i.e., ~/.ssh) in this example.

- Next, you’ll have the option of adding another layer of security by creating a password. You don’t want to add a password? Just leave it blank and hit Enter. Otherwise, choose a password and type it into the terminal. Be aware that when you enter it, it’ll look like you’re not typing anything. Don’t worry, you are; not displaying what you type is just a way to hide this secret from prying eyes. Once done, you’ll have to confirm it by re-entering your password. From now onward, you’ll be required to enter this password only when starting a new session.
Pro Tip: Why bother? Sometimes, developers and system admins use SSH without a password as it’s handy for fully automated systems. My suggestion? Don’t do that, if you can help it. Using a password here will give you an additional layer of security, and you’ll need to enter it only once at the beginning of each session anyway.

Congratulations! You’ve just generated your key pair. As you can see, in this case, the private key (i.e., id_rsa) and public key (i.e., id_rsa.pub) are both stored under the .SSH folder.

The system will also show you the key fingerprint and the algorithm used (e.g., the secure algorithm SHA-256).
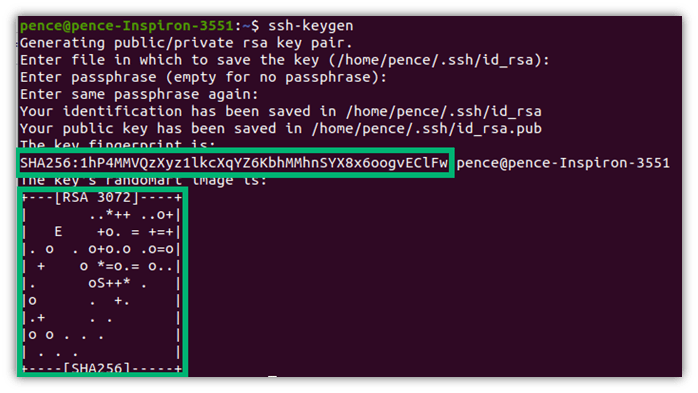
Want to make sure it was successful? Double-check it with the command we used in step 1:
ls -al ~/.ssh/id_*.pub
Or,
- Use the command ls -l /home/your_username/.ssh/ and check the content of the .ssh directory to find out if the public and private keys have been saved on your device.

3. Copy Your SSH Public Key
All you have to do now is to ensure that you can access the remote server without being required to enter your credentials. How do you do that? By simply copying the public key and uploading it to the server.
- In the terminal, type the command ssh-copy-id followed by your server’s username and its IP address or hostname (as show below):

- When prompted, enter the password you normally use to access the server. As before, it’ll look like you aren’t typing anything (this is a security protection against threats like shoulder surfing). Once authenticated, your public key will be added to the remote user-authorized keys file.
4. Test Your SSH Without a Password in Linux By Logging in to Your Server
You made it! Before you start celebrating, though, it’s time to test whether setting up the passwordless SSH in Linux worked. How? By trying to log in to your remote server via SSH by typing the following command into your terminal:
ssh server_username@server_ip_address (or hostname)
Did you get in? Success! You didn’t? Read on for some troubleshooting tips.
Troubleshooting When You Set Up of Passwordless SSH in Linux
If it didn’t work, you may want to check the following:
Did You Copy the Public Key to the Correct Location?
Log in to your server using your username and password. Navigate to your remote server’s home directory and verify that the public key is located in the ~/.ssh/authorized_keys file using the command cat .ssh/authorized_keys.
If it isn’t, move it and try the passwordless login again.
Are the “~/.ssh/” Directory Permission Set to 700, and Those For “~/.ssh/authorized_keys” to 600?
Navigate to the ~/.ssh directory and verify the permissions. If they aren’t set correctly, change them using the commands:
- chmod 700 ~/.ssh — Using this command prevents anyone aside from you from accessing the directory, and
- chmod 600 ~/.ssh/authorized_keys — This command ensures you’ll be the only one authorized to read and write the file.
Interested in knowing more about file permissions? Akamai published a pretty exhaustive article about it.
Is the SSH Server Configured on Your Remote Server to Allow Public Key Authentication?
To verify it,
- Go to the /etc/ssh/sshd_config file and open it with the editor of your choice.
- Check that the “PubkeyAuthentication” option is set to Yes. If it isn’t, change it, save the file, and restart the SSH service.
Optional Step: Disable SSH Password Authentication
Want to add the ultimate security measure to your remote server connections and transform them into something as secure as the North American Aerospace Defense Command (NORAD) at Cheyenne Mountain? Then you’ll want to disable the password authentication option from your SSH by doing the following:
- Log in to your remote server as root with the following command: ssh sudo_user@server_ip_address
- Navigate to the SSH configuration file, usually located in the .SSH folder at /etc/ssh/sshd_config.
- Open it with your chosen editor, and set all the following entries to “no”:
- PasswordAuthentication.
- ChallengeResponseAuthentication.
- UsePAM.
- Save the file and restart the SSH service with one of the following commands:
Are you still wondering why you should invest some of your precious time to set up passwordless SSH in Linux, as SSH already offers a secure connection thanks to encryption? We have a few insights for you that may make you reconsider the value of what you’ve just learned.
Why Should You Opt for Using Passwordless SSH in Linux?
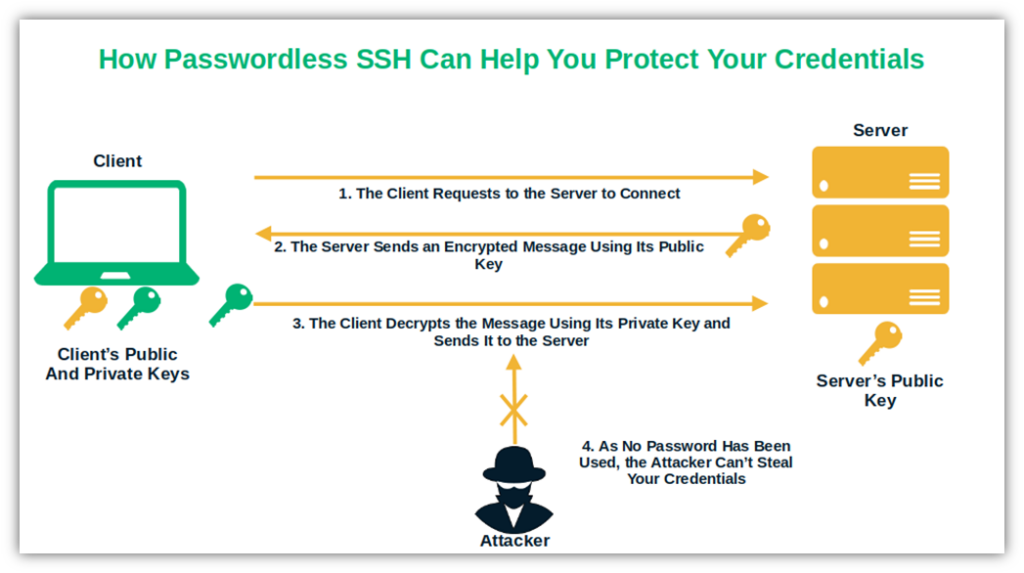
For starters, credentials are the keys to your kingdom (organization) and cybercriminals are attracted to them like vampires are attracted to blood. They love to target them through phishing and man-in-the-middle attacks. But how can the bad guys steal something that isn’t there? SSH without a password in Linux takes the game to a different level:
1. Passwordless SSH Is Harder to Compromise Than Traditional Password-Based SSH
No matter how complicated you make your passwords, attackers have ways to nail them. And, in some cases, these compromises are simply beyond your control. Consider what happened recently to more than 6,000 Norton LifeLock customers and Last Pass password vaults.
Do you have a habit of writing down your passwords or reusing them across multiple accounts? Both of these practices are bad ideas. What if you misplace those written notes or another account that uses the same password gets compromised? …Whoops! A malicious third party could find your password, and you’re done.
You and your admin would never do that? I’m sure you wouldn’t, but it does happen, as demonstrated by the latest GitGuardian report, which shows that 10 million credentials were leaked by developers in GitHub commits in 2022 alone. Yikes.
That’s life; we all make mistakes. But some errors can be prevented by using the right defensive security techniques. How?
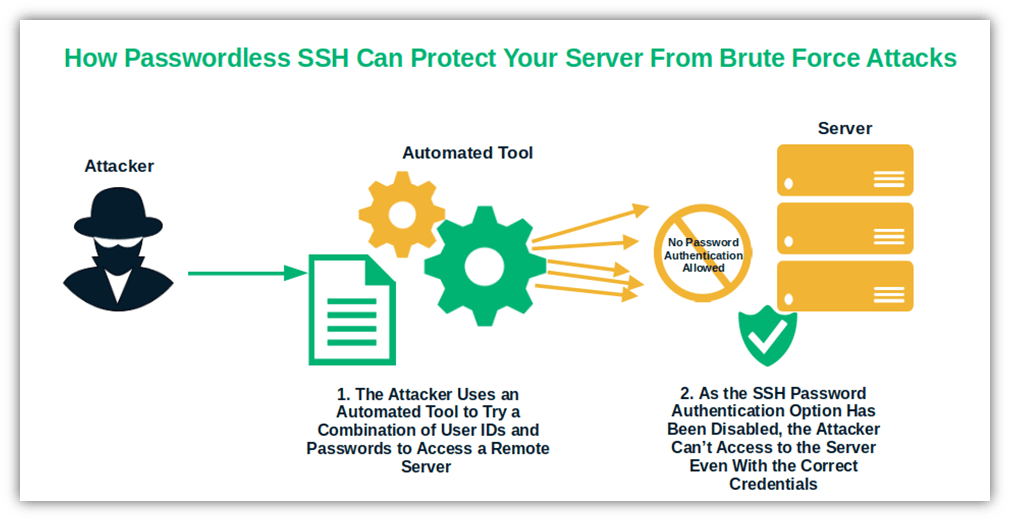
- Eliminate password-only authentication that’s susceptible to brute force and phishing attacks,
- Ensure you securely store and protect your private keys.
- Adhere to SSH key management best practices.
Because keys don’t expire, you have to take proper care of them or risk them becoming compromised. If you employ these techniques, then you mitigate many of these risks. No more passwords stolen through man-in-the-middle or brute force attacks.
2. Passwordless SSH Is Convenient to Use
Do you know why many developers save their project usernames and passwords in their commits? They do it for the same reason you might be tempted to use the same password on multiple websites: convenience. But convenience in these two cases can cost you a pretty penny if attackers manage to get access to your credentials. According to IBM, this can cost you $150,000 more than the average cost of a data breach (which already cost an average of $4.35 million per breach for organizations globally in 2022).
Implementing SSH without a password in Linux will give you the highest level of convenience. But it’ll also eliminate the risk of your credentials being stolen whenever you log in to your remote server. How? Well, when you start a session, you won’t have to enter them anymore.
3. SSH Without a Password in Linux Is Easy to Manage
Have you ever tried to count how many different passwords you must remember (and change from time to time)? I’ve counted mine and, believe it or not, I found out that I have more than 85 different accounts and passwords. This is massive! Do I remember all of them? Not a chance. There isn’t enough space in my little head for such a huge amount of gobbledygook.
With passwordless SSH in Linux, you’ll reduce the number of credentials to remember, and you won’t have to worry about changing the password regularly.
But what if you forget old, discarded keys somewhere and a cybercriminal finds them? (This is possible if you don’t properly manage your keys since they don’t expire.) This means that the bad guys who find them could still use them to access your server. That could be a problem. The solution? Another passwordless option that we’re going to briefly explore next.
If you want to explore more reasons why you should go for passwordless authentication in general, don’t miss our deep dive article about its pro and cons.
Final Thoughts on How to Set Up SSH Without a Password in Linux
Linux is gaining popularity among server administrators as a highly secure operating system. However, popularity inevitably attracts also unwanted attention. In fact, as more and more organizations are opting for Linux servers and platforms, the interest of cybercriminals looking to expand their hunting territory is waking up, too.
Setting up passwordless SSH in Linux and disabling traditional username and password-based authentication on your remote servers will help you double up on security and give you some peace of mind.
Yes, we all know that in cybersecurity, nothing is unbreakable (no matter how secure you think it is). But, by following the four steps listed in this article, you’ll slam another door in the face of potential attackers and learn something new. And this is priceless.





2018 Top 100 Ecommerce Retailers Benchmark Study
in Web Security5 Ridiculous (But Real) Reasons IoT Security is Critical
in IoTComodo CA is now Sectigo: FAQs
in SectigoStore8 Crucial Tips To Secure Your WordPress Website
in WordPress SecurityWhat is Always on SSL (AOSSL) and Why Do All Websites Need It?
in Encryption Web SecurityHow to Install SSL Certificates on WordPress: The Ultimate Migration Guide
in Encryption Web Security WordPress SecurityThe 7 Biggest Data Breaches of All Time
in Web SecurityHashing vs Encryption — The Big Players of the Cyber Security World
in EncryptionHow to Tell If a Website is Legit in 10 Easy Steps
in Web SecurityWhat Is OWASP? What Are the OWASP Top 10 Vulnerabilities?
in Web Security