


What to Do If Your Website Is Hacked

 (41 votes, average: 4.80 out of 5)
As recently as 2018, 67% of small and midsize businesses reported they suffered a cyber-attack and data breach. If you’ve discovered that your site is one of them, here’s what you can do to fix your hacked website…
Oh no, your website has been hacked! You may have discovered this due to your website being taken offline by your web host or an alert from a browser, user, Google Search Console, or something similar. Maybe you figured it out after seeing a huge (and otherwise unexplained) jump in traffic to your site.
But why is having your website hacked such an issue? A hacked website creates problems not just for you but for your customers as well. Hackers can launch phishing attacks and other cybercrime campaigns using your organization’s good name and reputation as a cover. They can use your site to:
- Run spam or malicious advertising campaigns,
- Steal sensitive data or phish sensitive information from your customers,
- Trick users into downloading malicious software (malware), and
- Cause penalties and/or fines to your organization.
So, now you know, and you are probably screaming on the hilltops “I have been hacked, how do I fix it?!” Well, don’t worry (I know, easier said than done) and try to take a deep breath — I’ve got you covered. Here’s a quick guide on what to do if your website is hacked.
Hacked Website Part 1: Figure Out the How, When & Where It Occurred
The first part of the process is to figure out when and where the incident took place. So, you’ll need to do your best Sherlock Holmes impersonation here. Now go grab your magnifying glass and get to work! Just kidding, you won’t quite need a magnifying glass, but there are some other handy tools that should help you detect when your website was infected.
Use a Malware Scanner
Malware is a huge threat for businesses and consumers alike. A malware scanner is a tool that automatically scans your website for suspicious malicious code and alerts you. If you already have a malware scanner set up, you’re in good shape. You should start by reviewing your malware scan history to pinpoint when your website first became infected. Thereafter, run a new malware scan to discover the exact files that are infected.
Once you have identified the files, you can sort through the source code to find the code snippet that is infecting your website.
You should also check the timestamp of the infected files to pinpoint the exact date and time of the infection. However, it should be noted that if your files have been updated by you or via an automation tool, then the timestamp won’t be accurate.
Find Visual Evidence
If you don’t have a malware scanner, a good hack (no pun intended) to discover where and when the infection took place is by digging through past saved versions of your website. A tool like the WayBack Machine is useful for this. Basically, you will need to go through past snapshots of your webpages and look for signs of the infection. This could be unusual links or strange visible code on your webpage. Like we said, you’ll need to put your detective hat on for this.
If you can’t find any visual evidence, it’s possible that the hacker is using a cloaking technique, which essentially means the hacker is showing different content to you and your users than the search engines. Luckily, you can fight this technique by using Google’s Hacked Sites Troubleshooter resource.
Other Best Practices to Follow When You Realize You Have a Hacked Website
Here are a few more actions you should take when you first discover the infection:
- Manually check your files and tables for malware. Take the time to manually review any recently modified files to see if there is anything suspicious or that stands out. Also check your database tables to remove any malware.
- Create a backup of your infected website. This will give you the option to compare files later. But be sure to not replace other backups that you think are not infected.
- Temporarily block access to your website for “routine maintenance.” This is done so you can protect both your users and your reputation while fixing the problem.
- Run a malware scan on your computer. This is key because if a hacker got to your website through your personal computer, you don’t want them to simply exploit the same vulnerability again.
Additional Considerations for eCommerce Businesses
Of course, there are some additional Payment Card Industry (PCI) compliance considerations for ecommerce businesses and organizations that handle payment card data. If your site’s hacked and you’re concerned about potential data exposure, refer to the guidance offered by the PCI Security Standards Council (PCI SSC) regarding cardholder data breaches and incident response.
Just be aware, this isn’t any type of legal advice. In fact, nothing in this article should be considered legal advice. For that kind of information, you should contact a legal processional.
Hacked Website Part 2: Fix the Problem ASAP
Now that you’ve identified the issue, have a backup to compare later and blocked user access, it’s time to roll up your sleeves and clean out your website. And don’t worry, there are some good cleaning options for you! There are four main methods to consider when purging the malicious code and restoring your website.
1. Do It Yourself (DIY)
Having a do-it-yourself attitude can be great depending on the project. A website cleanup can range from “I can jump right in and handle this myself” to “why did I ever think this was a good idea?”-level disasters. The amount of work that needs to be done really differs depending on how deep the infection runs (or what systems the attackers compromised). Luckily, if you followed Part 1, some of the work is already done and you know when your website was infected.
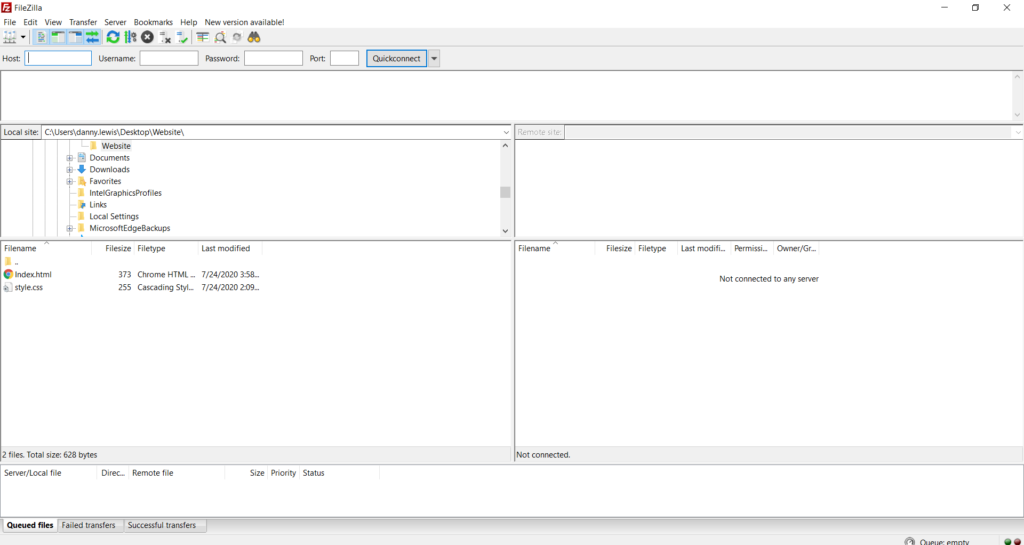
You’ll need to connect your website via a file transfer protocol (FTP) client. I personally like FileZilla. Below is glimpse of their interface:
Once connected, you literally need to check every folder on your website. It’s best to start with the files that were updated around the time of the incident. This will, hopefully, give you an idea of what malicious code snippets to look for. As you discover the infected files, you’ll need to remove the malware or replace it with uninfected versions.
In theory, it seems like a good idea to just jump in and fix the issues without having to use any supplementary tools. However, in addition to the process possibly being quite time consuming, you could miss some infected files. So, this is not the most comprehensive option if you aren’t website savvy.
2. Restore Your Site Using a Current (Clean) Website Backup
One of the easier options when repairing your website is to restore the last clean website backup that you have available. However, this is contingent on you having a good backup of your website. The work you did in Part 1 will ensure you know which backup is clean.
If you don’t have a website backup, I highly encourage you to start backing up your website moving forward. Something like CodeGuard is a really good option as it takes automatic backups and allows you to restore the last clean version with one click. As an added bonus, it comes with a malware scanner as well and also emails you whenever your website’s source code changes. Pretty nice, right?
If you do have a good backup, you should delete your current website and re-install your last clean version. One area to pay attention to is your database. If you have a website that accepts some type of submitted content, such as consultation requests, purchase orders, testimonials, etc., then the submitted content/requests will be deleted when you restore your backup. You can avoid this pitfall by:
- Review your database for malware before restoring it. If it’s clean, simply restore your website files only and leave your database untouched.
- Replace deleted content. Manually add in the deleted database rows that were erased when you restored your database.
- Clean your database only. Remove the malware from your database and only restore your website files.
3. Still Not Sure What to Do If Your Website Is Hacked? A Malware Scanner Could Be the Answer…
This is, by far, the easiest option of the four. All you literally need to do is:
- Select a malware scanner,
- Run a full site scan, and
- Initiate the repair feature.
Of course, you’ll want to double check your website via FTP afterward to ensure that all the malware is removed.
4. Completely Rebuild Your Website
This is an option I’d only recommend if:
- You don’t have a clean backup.
- Your website is so contaminated, you can’t get rid of the malware (e.g. your malware scanner didn’t do the trick).
The idea here is to basically rebuild your entire website (literally, your ENTIRE website) to ensure that you’re done with that pesky malware. To do this, you’ll need to:
- Create a new hosting account,
- Reinstall your CMS and themes/plugins, and then
- Start adding new content.
I know, I know, all your beautiful content is gone. Start by trying to scrum up as much content from past documents, emails, your Google Drive, etc. as possible to give you a starting point. You can also use the Wayback Machine and Google’s cache to find old webpages and scrape it for copy and images. Pulling images for the Wayback Machine is only a good idea if you’re images are clean and there isn’t malware embedded in them. If you aren’t sure, stick to pulling content from the other areas I mentioned.
Hacked Website Part 3: Prevent the Problem from Happening Again
Now, it’s time to mitigate your risk of falling victim to this type of cyber threat again. Your mission here is to patch as many vulnerabilities and block as many openings as possible. You should start by updating your software (many times, hackers find their way in through software that hasn’t been updated, such as website plugins).
You should then run both vulnerability and malware scans to ensure your restored (or new) website is clean. You should also manually review your website files to be absolutely sure there isn’t any malware left.
Update Your Login Credentials
Now that you got a shiny, clean website, you want to ensure you don’t let any more unwanted intruders in. It’s hard to know whether a hacker got ahold of one of your passwords when they got into your website. So, to be absolutely sure you’re using secure login info, you’ll want to update all of the credentials related to your website. Here are the accounts in particular that you should update:
- Web hosting accounts
- CMS accounts (Note: Check to see if there are any suspicious new accounts. If so, delete them.)
- Email accounts (associated with your website)
- Database accounts
It’s important to update your passwords with special characters, numbers, capital letters, lower case letters and length (around 15+ characters total should do the trick). And be sure to never use the same passwords on other accounts and websites!
Get Off the Website Blacklists
When a website is hacked, you could end up on a blacklist, such as Google’s blacklist. You can find out if you were blacklisted by Google by checking your Safe Browsing site status via the Google Transparency Report. You can also check if you are on an email spam blacklist via the MX Toolbox Blacklist Check.
You’ll need to submit a request to the host of the blacklist explaining what happened. I recommend being as expansive and clear as possible about what happened and how you fixed the issue. You can request your site’s removal from Google’s blacklist via your Google Search Console.
For maximum efficiency, I recommend using a malware scanner that has an automated blacklist removal feature. And then checking to see if you are on any blacklists after.
Use a Website Vulnerability Scanner Tool
Website vulnerability scanners are very useful in helping to keep an eye on the health of your website. For example, HackerProof Trust Mark scans your website on a daily basis for known vulnerabilities by checking it against a current database. If it identifies a vulnerability, you receive actionable recommendations for ways to remediate the issue.
Another great advantage of Hackerproof Trust Mark is that it’s a site seal. This offers visual assurances to your site users and customers that your site meets Sectigo’s security standards. It’s a win for you as well as your customers.
What Else You Can Do to Secure Your Website Against Future Threats
Of course, this list isn’t comprehensive. There are many other things you can do to make your website more secure — I just don’t have time to go into all of them here. With this in mind, be sure to check out our article that features 21 website security tips from 17 cybersecurity, website and IT pros.
Conclusion of What to Do If Your Website Is Hacked
As mentioned, you do not want a hacker to use your website to launch cybercrime campaigns and ruin your reputation in the process. It’s vital you act fast, but with vigilance, using the tips, tricks and tactics listed above. Remember that you want to:
- Figure out the how, when & where,
- Fix the problem ASAP,
- And then prevent the problem from happening again.
I hope that you now know what to do if your website is hacked. This three-part process can take on different forms depending on the circumstances of the incident, but with these methods and tools you should be able to save your website in any situation. And remember, preventative maintenance is always going to be your best weapon against a hacker. Best of luck!


2018 Top 100 Ecommerce Retailers Benchmark Study
in Web Security5 Ridiculous (But Real) Reasons IoT Security is Critical
in IoTComodo CA is now Sectigo: FAQs
in SectigoStore8 Crucial Tips To Secure Your WordPress Website
in WordPress SecurityWhat is Always on SSL (AOSSL) and Why Do All Websites Need It?
in Encryption Web SecurityHow to Install SSL Certificates on WordPress: The Ultimate Migration Guide
in Encryption Web Security WordPress SecurityThe 7 Biggest Data Breaches of All Time
in Web SecurityHashing vs Encryption — The Big Players of the Cyber Security World
in EncryptionHow to Tell If a Website is Legit in 10 Easy Steps
in Web SecurityWhat Is OWASP? What Are the OWASP Top 10 Vulnerabilities?
in Web Security