
 (29 votes, average: 4.76 out of 5)
5 easy steps to buy and install a DreamHost SSL certificate on your server
DreamHost is one of the most popular hosting service providers in the industry. If you’re hosting your website on it and need some guidance on how to gett a DreamHost SSL certificate, you’ve come to the right place.
First of all, DreamHost doesn’t have their own SSL certificates because they’re not a certificate authority (CA) — hence, they’re not allowed to issue an SSL certificate to any website. Thus, there is no certificate literally named a “DreamHost SSL certificate.” All SSL/TLS certificates you see on DreamHost are from third-party CAs that are approved by the CA/B Forum.
Note: The free SSL certificates affiliated with DreamHost are from Let’s Encrypt, and the commercial (paid) SSL certificates are from Sectigo (formerly Comodo CA). You can also buy the same Sectigo SSL certificate from the outside third-party vendor like SectigoStore.com at nearly 50% of the cost of buying through other routes and import it on your DreamHost server!
But enough about that for now. In this article, we’ll explore the DreamHost SSL buying options and SSL certificate’s importation/installation procedures.
How to Install a DreamHost SSL Certificate in 5 Quick and Easy Steps
Step 1: Choose the Right SSL Certificate
You will have three options for getting an SSL certificate:
- Get a free SSL certificate from Let’s Encrypt. These
free SSL/TLS certificates don’t come with any trust logo, warranty, or support (aside from
documents and web forums). - Get a paid Sectigo brand SSL certificate from
DreamHost. (Starts from $15/year) - Get a paid Sectigo (or any other) brand’s
SSL certificate from a third-party vendor. (Starts from $8.78/year)-a
significantly low-cost option
Get the Top-notch Brand Sectigo’s SSL certificate only for $8.95/year!
Save 87% on SSL Security Certificates! Get the lowest prices on trusted SSL certificates from Sectigo.
Shop NowIf you have chosen any of the first two options, please follow these installation steps.
If you have bought an SSL certificate from a third-party vendor (strongly recommended), please follow the below steps to import your certificate on DreamHost.
Step 2: Generate a CSR
You need a certificate signing request (CSR) —also known as a public key— for two specific purposes:
- Once you complete the purchase of your SSL
certificate, the CA will ask for a CSR code in order to issue an SSL
certificate. - You’ll need to have the CSR code available when
you’re installing an SSL certificate on the DreamHost server.
So, where do you get the CSR code? You need to request a CSR code from DreamHost’s support team.
Step 3: Complete the Validation Process
Before issuing an SSL certificate to your domain, the CA will verify your domain ownership. This two-step process will be the same for all the certificates, including the free ones:
- The CA will send you an email that contains a
verification link.
This email address must have your domain’s extension. For example, if your website is mydomain.com, the CA will send the verification email on one of the following email addresses.
- [email protected]
- [email protected]
- [email protected]
- If you don’t have any of such email addresses,
you need to opt for the Domain
Control Validation (DCV) process.
If you have bought a business verified SSL certificate, such as organization validated (OV) or extended validated (EV) SSL certificate, you need to go through additional verification steps, too.
Step 4: Gather All the Required Information and Files
Once you complete the verification process, the CA will send you the SSL certificate and other required documents via email. But before installing the SSL certificate on your DreamHost server, you first need the following things:
- Certificate signing request (CSR
code): This was generated in step 2. - SSL certificate: The CA has sent you a
file named yourdomain.crt. This is your SSL certificate. You need
to right-click on that file, navigate to Open and select Notepad
(or any other text editor). Save all the codes — you’ll require them later. - RSA private key: Generate a
private key on the DreamHost’s server and save it to a safe location. - Intermediate certificate (if any):
Sectigo might send the intermediate certificate. Generally, they would have a
.crt extension. For example, SectigoUTNSGCCA.crt, UTNAddTrustSGCCA.crt etc. You
need to save these codes in a text editor, too.
Step 5: Import the SSL Certificate in DreamHost Server Now, you can finish the DreamHost SSL certificate purchase and installation process by doing the following:
- Log in to your DreamHost
account. - Locate the SSL/TLS
Certificates option. - Click on the Add button to
the right side of your domain name. - Click on the Select This
Option under Import a Certificate.
You will see the following form. Fill out the required four fields with the information you gathered in step 4.
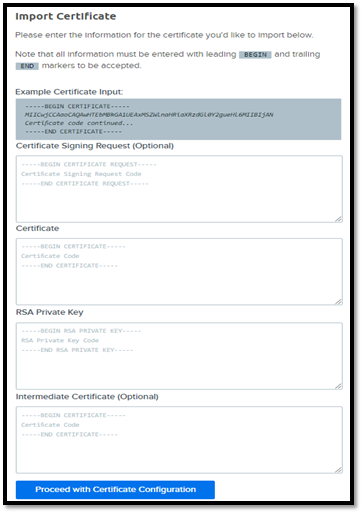
- Click on the Proceed with
Certificate Configuration tab. - If everything is
completed without error, you’ll see the certificate in the “Imported” section
under the SSL/TLS Certificate tab. - After 15 minutes, open your
website with HTTPS in the address bar. You will see a padlock symbol in front
of your domain name.