
Your step-by-step guide for installing a wildcard certificate on your Nginx server
If your search for a how-to guide for installing a wildcard certificate on the Nginx server led you here, then you’ve come to the right place! Many people find themselves here when looking for directions on how to install an “Nginx wildcard certificate” or “Nginx wildcard SSL.” In reality, what they’re really looking for is what you’re looking for — info on how to install a wildcard certificate on Nginx. From generating the CSR to installing the wildcard SSL on your Nginx server, we’ve got you covered. (If you’re specifically looking to install a Sectigo SSL certificate on Nginx, we’ve also got you covered with another article that details how to do that!)
If you haven’t already purchased a certificate, we have some great deals on wildcard certificates for you to check out.
How to Generate a CSR on Nginx
Before you can install an Nginx wildcard certificate, you first need to know how to create a certificate signing request, or what’s known as a CSR.
A CSR needs to be completed and submitted to the certificate authority (CA) for your certificate request to be validated and for the CA to issue your wildcard SSL cert. In this section, we’ll take a look at how to generate the CSR and obtain the wildcard certificate on Nginx. If you’ve already created a CSR on your server, skip over to the next part where we talk about installing wildcard SSL on Nginx.
Secure Unlimited Subdomains with One Wildcard SSL Certificate – Save 50%
Save 50% on Sectigo Wildcard SSL Certificates. It includes unlimited server licenses, reissuances, 256-bit encryption, and more.
Connect to Your Nginx Server
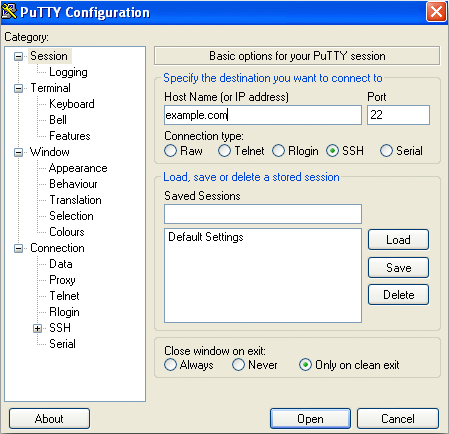
Connect to your server via SSH, using an SSH client like Putty, and log in as a privileged user (such as root account).
Run the Following Code in Your Terminal
Once the connection is established and you have access to the terminal window, enter the following:
openssl req –new –newkey rsa:2048 –nodes –keyout (server).key –out (server).csr
Note: Rename the “server” based upon what you wish to call your CSR and private key.
You will be prompted to enter some additional details. Enter the hostname or FQDN for your wildcard cert correctly (should look something like *.mysite.com). Ensure that all the specifics are filled-in accurately as a failure to do so will require you to generate a new request.
Access the CSR
Once the information is filled, the server will generate and store the CSR as well as the private key under the user directory of the account where you’ve signed in. To open the CSR, enter the following command:
nano (sever).csr
Save the CSR and Share It with Your CA
Once you’ve opened the CSR using any text editor, copy the entire contents of the file including the following, before sharing it with the CA:
——BEGIN CERTIFICATE REQUEST——
And
——END CERTIFICATE REQUEST——
Once the CSR is generated and submitted, the CA will review your request and issue the wildcard certificate. Yes, it’s really that easy!
Now that we have the CSR generation instructions out of the way, we can move on to the main event. Here’s what you need to know about how to install a wildcard certificate on Nginx.
Installing a Wildcard Certificate on Nginx in 5 Simple Steps
Once the CA has shared the certificate files with you, it’s time to install them on your server! The steps below detail the installation process. We also will take a look at the configurations that need to be tweaked in order to get HTTPS up and running.
Step One: Connect to the Server
Connect to your Nginx server (from which you generated the CSR) via FTP or SSH using a privileged account.
Step Two: Copy All of the Certificate Files
Copy all the files in the certificate package that was shared by the CA and place them in the appropriate directories. It’s recommended to store them under the “/etc/ssl” directory on your server.
Step Three: Combine the Primary and Intermediate Certificates
For the next step, run the following command to concatenate your primary and intermediate certificates:
cat your_domain_name.crt intermediate.crt >> bundle.crt
Step Four: Edit the Nginx Virtual Hosts File
Next, edit your virtual host files to reroute connections through port 443 by adding the code snippet given below in bold:
server {
listen 443;
ssl on;
ssl_certificate /etc/ssl/your_domain_name.pem; (or bundle.crt)
ssl_certificate_key /etc/ssl/your_domain_name.key;
server_name your.domain.com;
access_log /var/log/nginx/nginx.vhost.access.log;
error_log /var/log/nginx/nginx.vhost.error.log;
location / {
root /home/www/public_html/your.domain.com/public/;
index index.html;
}
}
Step Five: Restart Nginx.
Restart your server using the following command:
sudo /etc/init.d/nginx restart
Top NGINX Wildcard SSL Certificate
| Features | PositiveSSL Wildcard (DV) | Sectigo SSL Wildcard Certificate (DV) | Sectigo OV Wildcard SSL |
|---|---|---|---|
| Lowest Price | $78.32/yr | $199.20/yr | $399.20/yr |
| Domains Secured | Secure Unlimited Subdomains | Secure Unlimited Subdomains | Secure Unlimited Subdomains |
| Validation Level | Domain Validation | Domain Validation | Organization Validation |
| SSL Encryption | up to 256-bit | up to 256-bit | up to 256-bit |
| Key Length | 2048 bits | 2048 bits | 2048 bits |
| Server License/td> | Unlimited | Unlimited | Unlimited |
| SSL Site Seal | Included | Included | Included |
| Reissue Policy | Unlimited | Unlimited | Unlimited |
| Warranty | $50,000 | $1,000,000 | $500,000 |
| Refund Policy | 30 Days | 30 Days | 30 Days |
| Wildcard Support | Yes | Yes | Yes |
| Browser Support | 99% | 99% | 99% |
| OS Support [Desktop] | Yes | Yes | Yes |
| OS Support [Mobile] | Yes | Yes | Yes |
| Buy Now | View Product | View Product | View Product |