
Does WordPress back up automatically? Yes — we’ll show you how
Technically, WordPress doesn’t take automatic backups by itself.
To schedule a WordPress automatic backup, you need to install a third-party tool and/or a plugin. Automatic WordPress backup means you schedule the backups for a fixed interval of time (daily, weekly, monthly, etc.) and let the backup tool take the backup for you. This is a way safer method than relying on manual backup methods.
There are many WordPress backup tools and plugins available in the market. You can choose any tool as per your requirement and budget. In this article, we use CodeGuard to illustrate automatic backup procedures. The reasons we have chosen CodeGuard specifically is because it:
- Is very easy to use.
- Is inexpensive, starting at just $1.63/month.
- Comes with free malware scan and removal.
- Provides free space on third-party cloud platform Amazon AWS.
- Comes with a free auto-delete function that automatically discards old backups.
- Offers a one-click website restore.
- Enables automatic 256-bit AES encryption of backup files
Get CodeGuard for Only $1.63/Month!
Its More than Just a Backup Tool! Get Free Malware Removal, Free AWS Storage Space, One-Click Restoration and Strong 256-bit AES encryption of Backup Files with CodeGuard!
Shop Now
Schedule Automatic WordPress Backup in 10 Easy Steps
Installing an automatic WordPress backup plugin is very easy. Follow these 10 steps and schedule automatic backup for your WordPress site and database in no time:
Step 1: Buy and Install Your Favorite Backup Tool/Plugin
As we said earlier, in this article, we have used CodeGuard for the backup process. Click here to choose an appropriate plan and make a purchase.
Step 2: Access Your Subscription Link from Your Account Dashboard
Once you make a purchase, you will get a link that you lead you to the CodeGuard subscription page. You can also access that link from your dashboard by login to your account.

Step 3: Choose Your Backup Method
Once you log in to the CodeGuard dashboard, you will need to choose between two backup method options.
- Add FTP/SFTP Website. Choose this option if you have a basic or professional plan, and if your website (either a WordPress or non-WordPress site) requires vast storage (i.e., 100+MB). Please follow this article if you have chosen the FTP/SFTP backup method.
- Add WordPress Website. Select this option for getting a CodeGuard plugin on your WordPress dashboard. It is preferable for Premium, Team, and Business plans. You can have the WordPress plugin also for Basic and Professional plans if your site is small and doesn’t require much space.

Step 4: Write Down Your URL and Click Next

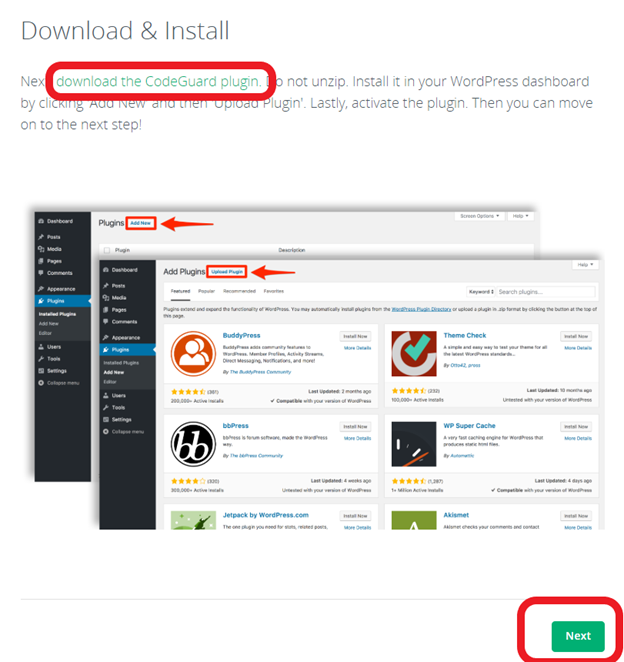
Step 5: Download But Refrain From Unzipping the Plugin File
You will be asked to download the CodeGuard plugin. The downloaded file will be in the Zip folder. Don’t extract it! Click Next.
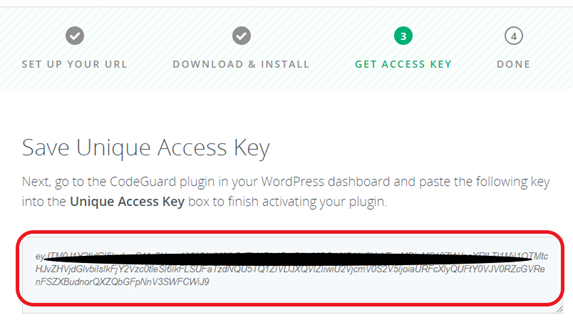
Step 6: Record and Save Your Access Key for Later Reference
In the next step, you will be given a unique access key. Copy-paste it in a text editor or save it to a safe location. You’ll need it when you install the CodeGuard plugin on the WordPress dashboard.
=========Steps to install automatic backup plugin on WordPress dashboard================
Step 7: Login to Your WordPress Account
From the dashboard, follow this path:
- Select Plugins from the left side of the screen.
- Click Add New.
- Upload Plugin.
- Choose File.
- Select the zip folder that you downloaded in step 5 from the CodeGuard dashboard.
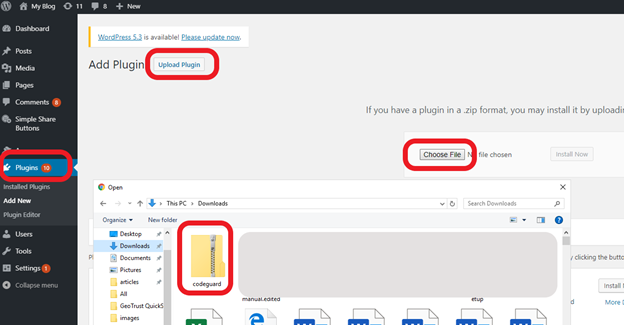
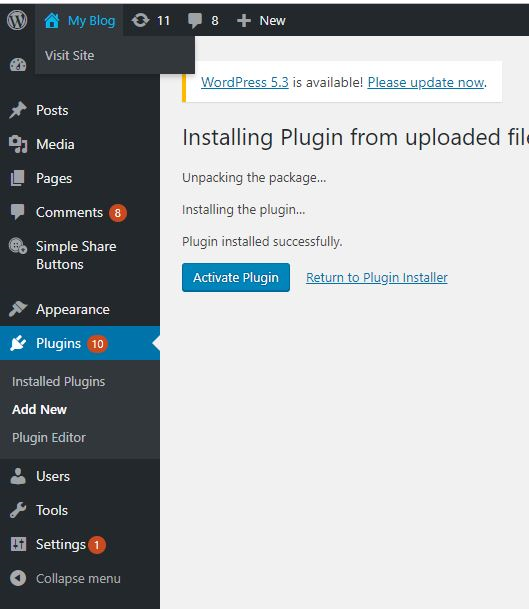
Step 8: Activate the Plugin
Once the plugin upload is complete, click on Activate Plugin.
Step 9: Enter Your Unique Access Key
Click on the CodeGuard plugin tab from the WordPress dashboard. You’ll be asked for the unique access key, which you received earlier (refer to step 6). Copy the key from your CodeGuard dashboard or text editor and paste it in the given textbox. Click Save.

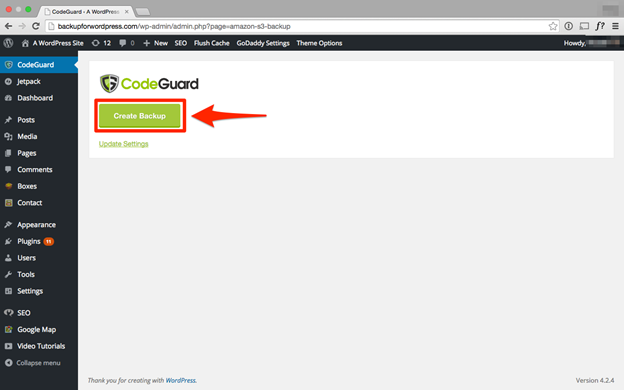
Step 10: Create Your Website Backup
Once the key is successfully verified, you will be given an option to create your first backup.
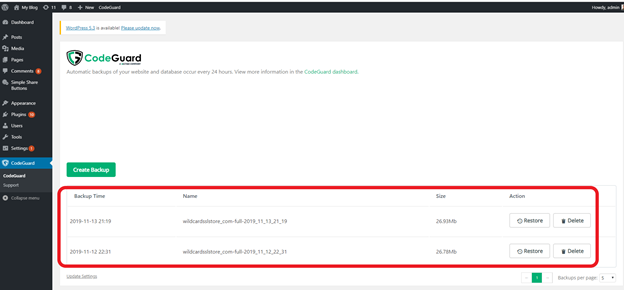
From now on, CodeGuard will automatically back up your WordPress site on a daily basis.
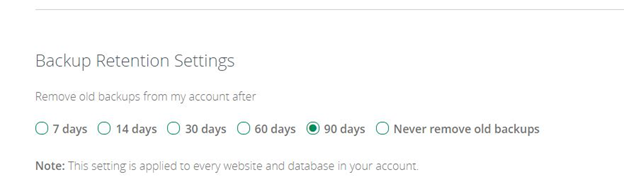
By default, CodeGuard retains your backup for 90 days. However, you can customize this frequency.
Under the Backup Retention Settings section, you can customize the retention frequency. Simply go to your CodeGuard dashboard > Settings > Account and make your changes there.
Congratulations! You have successfully installed the plugin and initiated an automated backup procedure on your WordPress site. Now sit back and relax. Let the plugin do the complicated backup work for you!