Getting a new SSL certificate can be a daunting process, especially since there are so many different options available. Wildcard SSL certificates are the best choice when it comes to securing multiple subdomains on a single website. If you’ve been searching for “exchange 2025 wildcard certificate” or “wildcard certificate exchange 2025”, we’ve got you covered.
In this article, we’ll discuss what a wildcard certificate is, why you should buy it, and how to get one for your Microsoft 2025 server.
Secure Unlimited Subdomains With One Wildcard SSL Certificate – Save 50%
Save 50% on Sectigo Wildcard SSL Certificates. Includes unlimited server licenses, reissuances, 256-bit encryption, and more.
What Is an Exchange 2025 Wildcard Certificate?
A wildcard certificate is a single SSL/TLS certificate that you can use to secure an unlimited number of single-level subdomains for a single website.
All wildcard certificates from any certificate authority (CA) are compatible with Microsoft Exchange servers. this means that, contrary to popular belief, there is no specific wildcard certificate that will only work on an Exchange 2025 server. This can be a bit confusing, though, because a wildcard certificate that’s used on an Exchange 2025 server is sometimes referred to as an “Exchange 2025 wildcard certificate.”
To gain a better understanding of how to use an Exchange 2025 wildcard certificate, let’s consider the following example. Suppose Jerry, a young fellow starting out his own business, has the website domain randomexample.com. As the business grows, he’d want to provide his customers with useful information, so he will need a blog — something that can be accessed through blog.randomexample.com. He might also want to create a product page like product.randomexample.com or a customer login page like users.randomexample.com.
To secure all of these individual URLs using standard SSL/TLS certificates will quickly become a headache (considering certificate expirations, renewals, the entire certificate management cycle, etc.) and can also get fairly expensive pretty quickly. Instead, since Jerry is smart, he decides to use a single wildcard certificate for “*.randomexample.com” to secure all his present and future first-level subdomains.
Now, if Jerry wants to secure subdomains at multiple levels like mail.users.randomexample.com and order.users.randomexample.com along with the above, or if he decides that he wants to secure the subdomains on multiple domains, he’d need to opt for a multi-domain wildcard SSL certificate. These can secure just about anything (including IPs) — all on a single certificate — simply by adding your URLs as subject alternative name domains (SANs).
Why Should You Consider Getting a Wildcard Certificate?
There are a couple of direct benefits to buying a wildcard SSL to secure your sites:
- Wildcard certificates are useful, particularly if you’re planning to enable HTTPS across multiple subdomains for your website (even when you’re not sure of all the subdomains you wish to add)! With a regular wildcard certificate, you can continue adding subdomains (on that same level) even after the certificate is issued, and they will be accessible over HTTPS automatically!
- A wildcard SSL certificate is easy to use and offers hassle-free certificate management that:
- saves time,
- reduces the likelihood of leaving your websites unencrypted, and
- is a cost-effective solution that won’t burn a hole through your pockets.
Wondering how to get a wildcard certificate for your Exchange 2025 server? The first step after purchasing a wildcard cert is to generate a certificate signing request, or a CSR.
10 Steps for Generating a CSR on Exchange 2025 for a Wildcard Certificate
You can use the Exchange Admin Center (EAC) or the Exchange Management Shell to generate a certificate signing request to obtain your Exchange 2025 wildcard certificate. The first method using EAC is easier to follow for the general audience, so let’s move ahead with that:
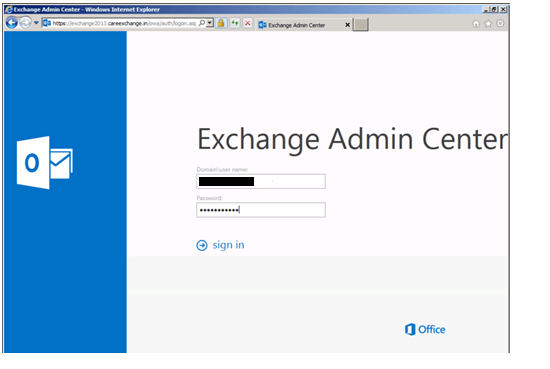
Step 1: Access Your Exchange Admin Center
Open a browser and log in to the EAC console after entering your username and password (as shown below).
Step 2: Select Your Server
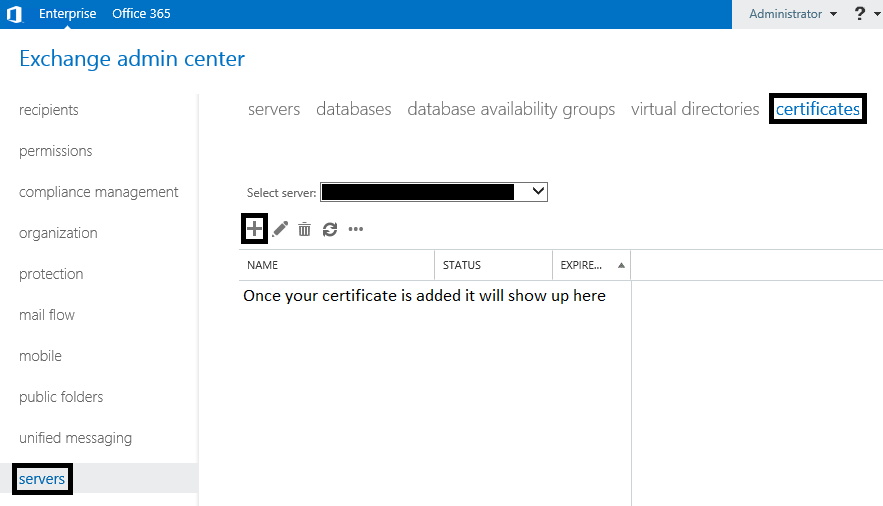
From the left sidebar, select Servers and click on Certificates in the top menu bar. Select your server from the dropdown list on the Certificates page and click on the + symbol.
Step 3: Create a New Exchange Certificate Request
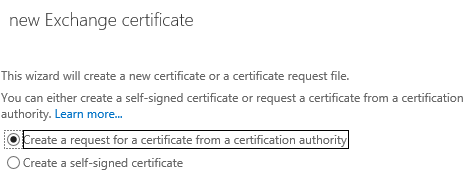
In the new Exchange certificate wizard that pops up, select Create a request for a certificate from a certification authority and then click on Next.
Step 4: Enter a Friendly Name
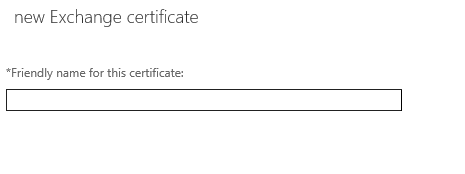
In the next screen, enter a friendly name for your certificate that you can use to identify it, and click Next.
Step 5: Select the Option for a Wildcard Certificate
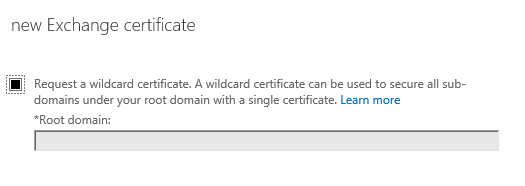
Since we’re requesting an Exchange 2025 wildcard certificate, ensure that the option “Request a wildcard certificate” is selected, and enter the root domain like “example.com.”
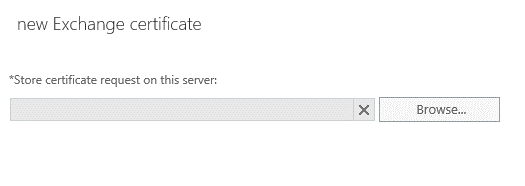
Step 6: Select the Server Where You Want to Save the Certificate
Once that’s done, choose the server where you want to save the request and click on Next. This is the server on which you will complete the request later on and install the certificate. Since these certificates come with unlimited server licenses, they can be exported from this server and imported onto others with ease.
Step 7: Review the Services
The next step that involves specifying the domain names and the services to be included on the certificate can be skipped since we’re using a wildcard certificate.
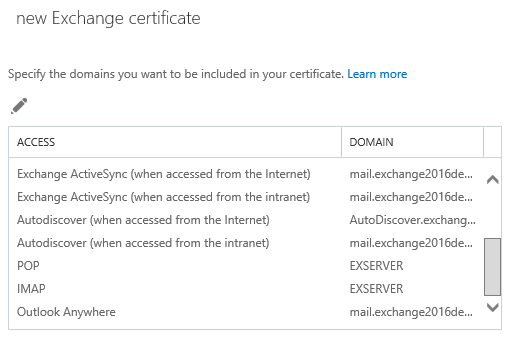
You’re also given the option to edit the domain names on the next screen. If you don’t wish to edit make any changes, move on to the next step.
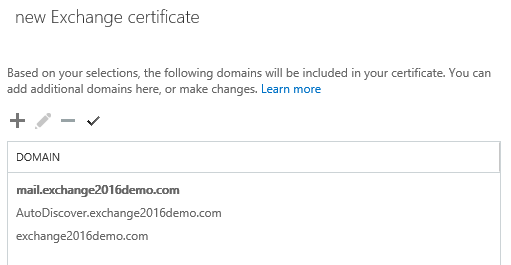
Step 8: Fill in the CSR Details
Enter the CSR details carefully, avoiding any mistakes, and then click on Next.
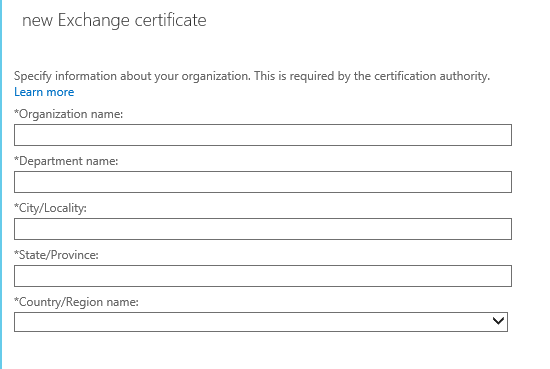
Step 9: Save the CSR
Enter the path where the CSR for your Exchange 2025 wildcard certificate is to be saved as a “.req” file and click on Finish. Do not skip or ignore this step!
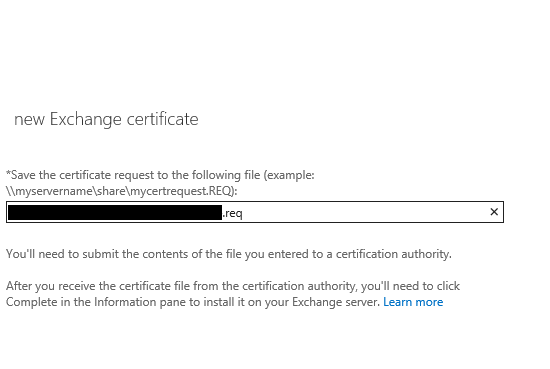
Step 10: Generate the Order
Navigate to the universal naming convention (UNC) path (the one starting with double backslashes) in the previous step and open the newly created CSR file using any text editor (such as Notepad). Copy all of its contents, including the following, before sharing it with your CA:
----BEGIN CERTIFICATE REQUEST----
And
----END CERTIFICATE REQUEST----
Note: It’s crucial for this information to match the information that was submitted in the CSR process.
Once your order is placed, the CA will process your application based on the validation level of your certificate, issue your SSL, and share it with you. Once you have your wildcard certificate, the next step is to install it on your Exchange 2025 server.
4 Steps for Installing a Wildcard Certificate on Exchange 2025
Once you complete this process, you’ll be ready to access your website and its subdomains over a secure connection.
Step 1: Log in to EAC
Enter your username and password to login to the EAC platform.
Step 2: Navigate to the Certificates Page
Click on Servers on the left sidebar and select Certificates from the top menu bar. You should see your certificate listed by its friendly name with the status as “Pending request.” After selecting it, in the right-hand pane, press the option to “Complete” the pending request.
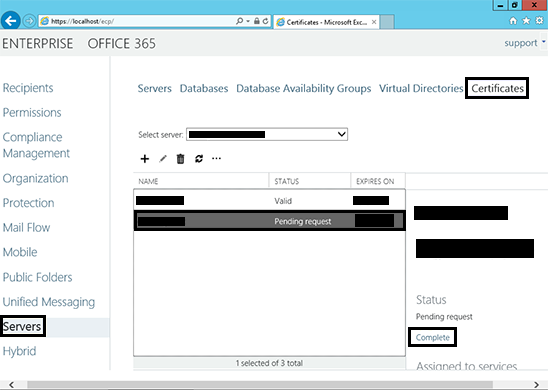
Step 3: Enter the Certificate Path to Complete the Pending Request
In the dialogue box that pops up, enter the path of the certificate (the one shared by the CA) to be imported and then select OK.
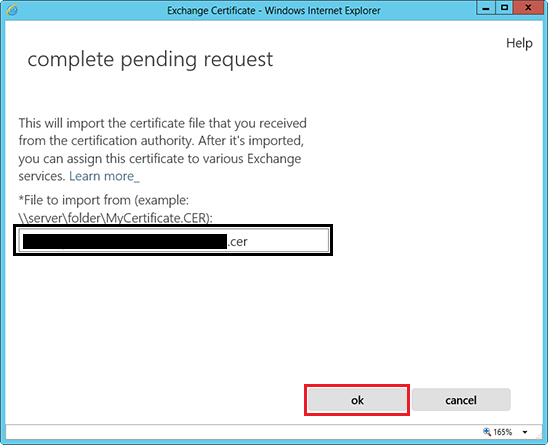
Step 4: Enable Services
Once that’s done, go back to the Certificates page and click on the! symbol (edit button) after selecting your certificate from the list.
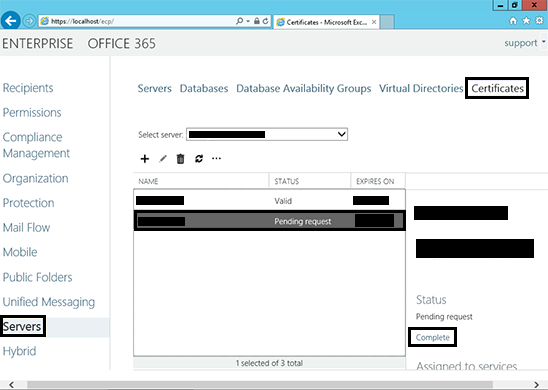
Select the services you wish to assign and then click Save.

Your Exchange 2025 wildcard certificate is now installed, and you can access your sites over HTTPS. Use the SSL Checker tool to verify that the installation was completed without any errors.
SSL Certificate for Subdomain – How Do I Get One for My Website?
 (26 votes, average: 4.85 out of 5)